> ## Documentation Index
> Fetch the complete documentation index at: https://docs.valiyou.com/llms.txt
> Use this file to discover all available pages before exploring further.
# Users
> Invite users, manage permissions, and control team access with role-based permissions
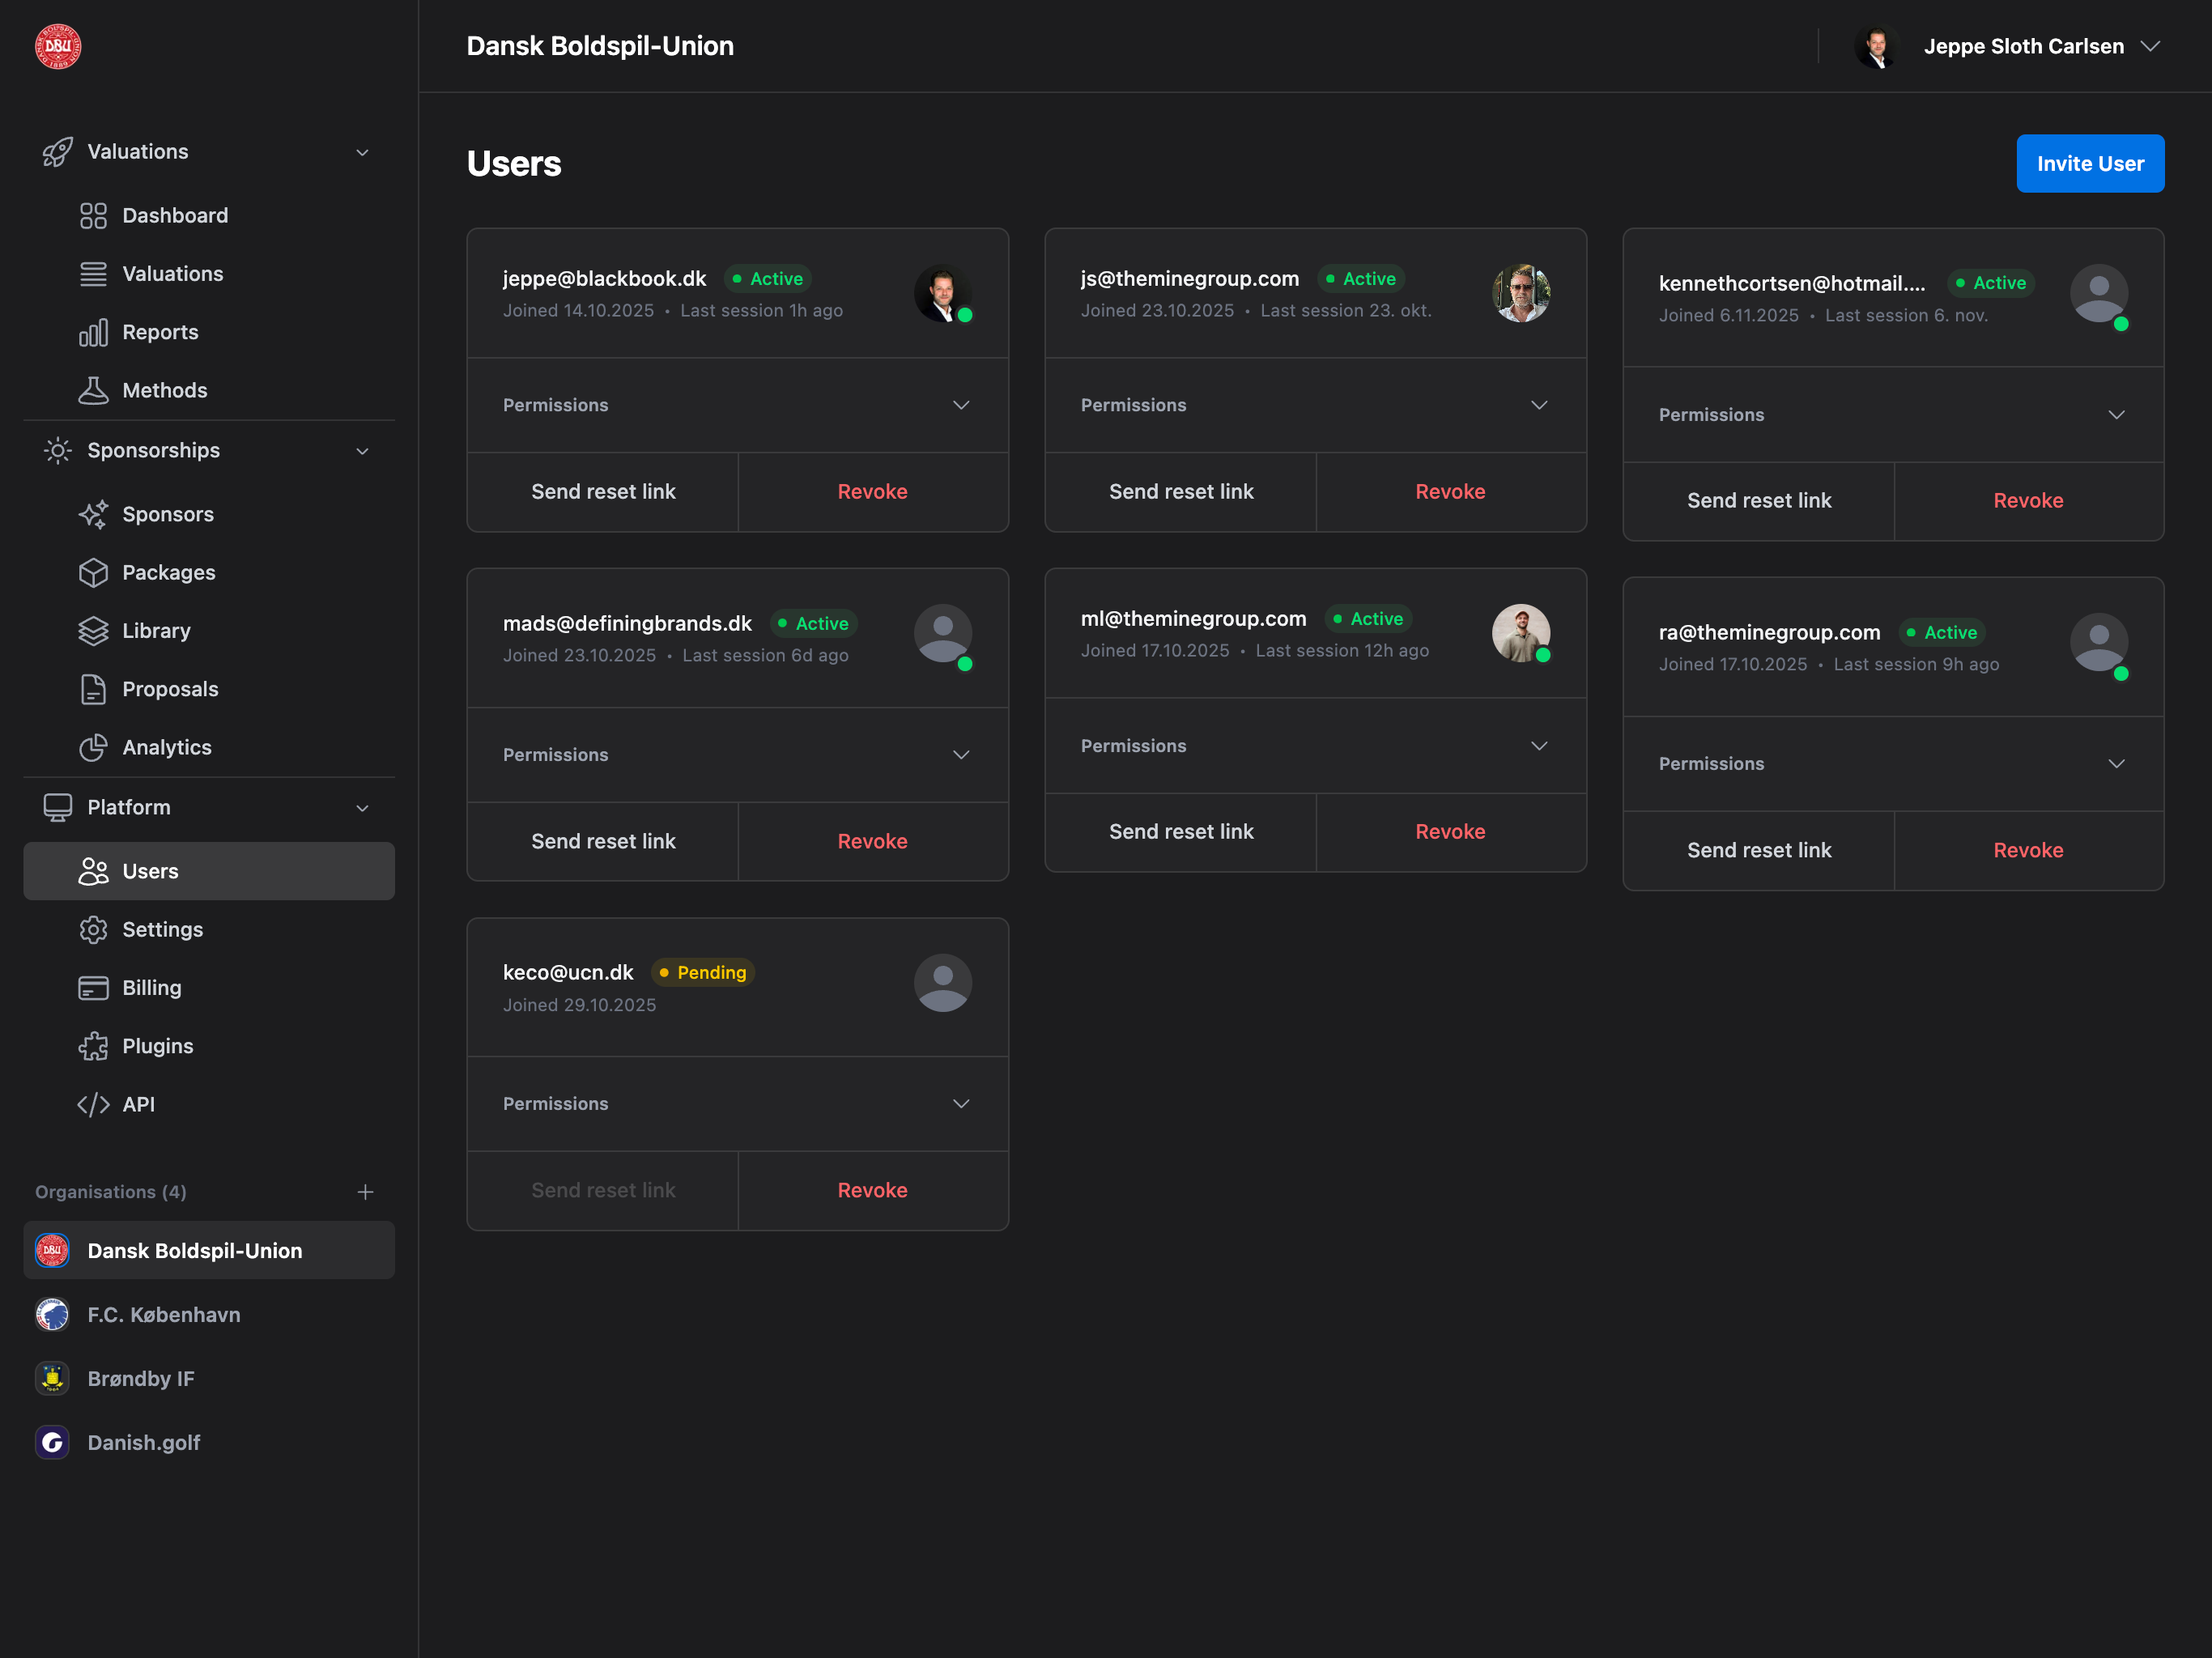 Comprehensive team member management including invitations, role assignments, permission control, and user administration.
## Accessing Team Management
Navigate to **Platform** → **Users** from the sidebar to access team management.
**Permission Required**: User Management permission or Admin access required to view and manage team members.
## Page Layout
### Page Header
* **Title**: "Users"
* **Invite User Button**: Top right (primary blue button, rounded)
* Disabled if seat limit reached (shows "Limit reached")
* Opens Invite User modal
### Users Grid
* Masonry grid layout (responsive columns)
* User cards with permissions and actions
* Sorted: Active users first, then by email alphabetically
### Empty State
* Icon: Users icon
* Title: "No users yet"
* Message: "Get started by inviting your first user"
* Action: "Invite User" button
## User Cards
Masonry grid of user cards with comprehensive user information.
### Grid Layout
**Responsive Columns**:
* Desktop (>1280px): 3 columns
* Tablet (1024-1280px): 2 columns
* Mobile (\<640px): 1 column
**Auto-height**: Cards adjust height based on content (permissions expanded/collapsed)
### Card Structure
Each user card displays:
#### Header Section
**User Information (Left)**:
* **Email Address**: Primary identifier (bold, medium text)
* **Status Badge**: Active (green) or Pending (yellow) with dot indicator
* **Joined Date**: "Joined DD/MM/YYYY" format
* **Last Session**: "Last session X ago" (active users only)
**Avatar (Right)**:
* 40×40px circular avatar
* Shows uploaded profile picture or default user icon
* **Admin Indicator**: Green dot badge on bottom-right if user has Admin role
**Admin Visual**: Users with Admin role have a small green indicator dot on their avatar for quick identification.
#### Permissions Section
**Collapsible Permissions**:
* **Header**: "Permissions" label with up/down chevron
* **Click to Expand**: Shows full permissions tree
* **Default**: Collapsed (click to expand)
**When Expanded**:
* Full permissions tree with all roles
* Checkboxes for each permission
* Nested structure (Admin → Sub-roles)
* Real-time toggle (optimistic updates)
**Permissions Tree Structure**:
```
☑ Admin
├─ Valuations
│ ├☑ Dashboard
│ ├─ Valuations
│ │ ├☑ Edit Sales Value
│ │ ├☑ Edit Transfer Value
│ │ ├☑ Edit Marketing Value
│ │ └☑ Edit Brand Value
│ ├☑ Reports
│ └☑ Methods
├─ Sponsorships
│ ├☑ Sponsors
│ ├☑ Packages
│ ├☑ Library
│ ├☑ Proposals
│ └☑ Analytics
└─ Platform
├☑ Users
├─ Settings
│ ├☑ General
│ ├☑ SSO
│ └─ Advanced
│ └☑ Audit Log
├☑ Billing
├☑ Plugins
└☑ API
☐ Approver (independent permission, not under Admin)
```
**Admin Auto-Check**: Enabling Admin automatically grants all sub-permissions. Disabling Admin only removes the Admin flag, keeping other permissions intact.
#### Actions Section
**Two Action Buttons** (bottom of card):
**Send Reset Link** (Left):
* Text: "Send reset link"
* Action: Sends password reset email to user
* **Disabled**: For pending invitations (not yet active)
* Confirmation modal: "Send Password Reset Link"
**Revoke** (Right):
* Text: "Revoke" (red text)
* Action: Removes user from organization or cancels invitation
* **Active Users**: "Remove User" confirmation
* **Pending Invitations**: "Cancel Invitation" confirmation
* Destructive action (requires confirmation)
## Invite User
Add new team members to your organization via email invitation.
### Opening Invite Modal
**Triggers**:
* Click "Invite User" button (page header)
* Click "Invite User" in empty state
* Keyboard shortcut (if configured)
**Seat Limit Check**:
* If limit reached: Shows "Limit Reached" modal instead
* If under limit: Opens Invite User modal
### Invite User Modal
**Modal Structure**:
* Title: "Invite User"
* Close button (X, top right)
* Email input field
* Permissions tree selector
* Cancel and Send Invitation buttons
**Email Field**:
* Label: "Email Address"
* Placeholder: "[colleague@company.com](mailto:colleague@company.com)"
* Validation: Must be valid email format
* Required field
**Permissions Tree Selector**:
* Same structure as user card permissions
* Pre-select appropriate roles
* **Admin Auto-Select**: Checking Admin checks all sub-roles
* **Approver**: Independent checkbox (not under Admin)
**Action Buttons**:
* **Cancel**: Close without sending
* **Send Invitation**: Send invitation email (primary blue button)
### Invitation Process
**Step 1: Submit Invitation**:
1. Enter email address
2. Select permissions/roles
3. Click "Send Invitation"
4. Modal closes on success
**Step 2: Invitation Sent**:
* User added to grid with "Pending" status (yellow badge)
* Invitation email sent to recipient
* Card shows pending state (no "Send reset link" button)
**Step 3: Recipient Receives Email**:
* Email contains:
* Organization name
* Inviter's name
* Assigned roles/permissions
* Invitation link
* Expiration date
**Step 4: Recipient Accepts**:
* Click invitation link
* Log in or sign up with same email
* Accept invitation
* User status changes to "Active" (green badge)
* Card enables all features
**Email Match Required**: Recipients must use the exact email address that received the invitation. Invitations cannot be transferred to different addresses.
## Managing Permissions
Control what team members can access and do in your organization.
### Permission Roles
**Admin**:
* Full access to everything
* Can manage all users and settings
* Automatically includes all sub-permissions
* Green indicator dot on avatar
**Dashboard**:
* View dashboard overview
* See organization metrics
**Reports**:
* Access valuation reports
* View analytics
**Sales (CFO)**:
* Manage sales value in valuations
* View financial data
**Transfer**:
* Manage player transfers
* Edit transfer values
**Marketing**:
* Manage marketing value
* Edit media data
**Brand**:
* Manage brand indicators
* Edit brand multiplier
**Users**:
* Invite and manage team members
* Assign permissions (except Admin)
* Remove users
**Billing**:
* Access billing page
* Manage subscription
* View invoices
**Settings**:
* Edit organization settings
* Configure defaults
**Plugins**:
* Enable/disable plugins
* Configure integrations
**Audit Log** (Enterprise only):
* View audit trail
* Export logs
**API**:
* Create API keys
* Manage API access
**Approver** (Independent):
* Approve valuations
* Review reports
* Not auto-granted with Admin
**Granular Control**: Assign only the permissions each team member needs. Follow principle of least privilege for security.
### Granting Permissions
**Method 1: During Invitation**:
1. Open Invite User modal
2. Check desired permissions in tree
3. Send invitation
4. User receives those permissions on acceptance
**Method 2: Edit Existing User**:
1. Find user card
2. Click "Permissions" to expand
3. Check/uncheck permissions
4. Changes save automatically (optimistic update)
5. Confirmation modal appears for each change
**Permission Change Confirmation**:
* Title: "Grant Permission" or "Revoke Permission"
* Message: "Grant '\[Role Name]' permission to \[email]?"
* Buttons: "Grant"/"Revoke" (destructive for revoke) or "Cancel"
**Instant Updates**: Permission changes apply immediately with optimistic UI updates. If the server request fails, changes are reverted automatically.
### Revoking Permissions
**Process**:
1. Expand permissions on user card
2. Uncheck permission checkbox
3. Confirmation modal appears
4. Click "Revoke" to confirm
5. Permission removed instantly (optimistic update)
**Special Cases**:
* **Admin Removal**: Removes only Admin flag, keeps other permissions
* **All Permissions**: Removing all permissions leaves user with no access (valid state)
* **Pending Users**: Cannot modify permissions (must wait for acceptance)
### Permission Hierarchy
**Admin Behavior**:
* **Granting Admin**: Automatically grants all sub-permissions
* **Revoking Admin**: Only removes Admin flag, preserves other permissions
* **Manual Grant All**: If user has all sub-permissions, Admin is auto-granted
**Example Scenarios**:
**Scenario 1: Grant Admin**
* Before: User has \[Reports, Sales]
* Action: Check Admin
* After: User has \[Admin, Dashboard, Reports, Sales, Transfer, Marketing, Brand, Users, Billing, Settings, Plugins, Log, API]
**Scenario 2: Revoke Admin**
* Before: User has \[Admin, Dashboard, Reports, Sales, ... all]
* Action: Uncheck Admin
* After: User has \[Dashboard, Reports, Sales, ... all except Admin]
**Scenario 3: Grant All Manually**
* Before: User has \[Dashboard, Reports, Sales, Transfer, Marketing, Brand, Users, Billing]
* Action: Check Settings, Plugins, Log, API (now has all)
* After: User automatically gets \[Admin, ... all]
## Removing Users
Remove team members or cancel pending invitations.
### Removing Active Users
**Process**:
1. Find user card
2. Click "Revoke" button (red text)
3. Confirmation modal appears:
* Title: "Remove User"
* Message: "Remove \[email] from organization?"
* Buttons: "Revoke" (red) or "Cancel"
4. Click "Revoke" to confirm
5. User removed from organization
6. Card disappears from grid
**What Happens**:
* User loses access to organization immediately
* User's data (valuations, edits) remains intact
* User receives notification email (optional)
* Can be re-invited later
### Canceling Pending Invitations
**Process**:
1. Find pending user card (yellow "Pending" badge)
2. Click "Revoke" button
3. Confirmation modal appears:
* Title: "Cancel Invitation"
* Message: "Cancel invitation for \[email]?"
* Buttons: "Cancel" (red) or "Cancel" (gray)
4. Click red "Cancel" to confirm
5. Invitation cancelled
6. Card disappears from grid
**What Happens**:
* Invitation link becomes invalid
* Pending user can no longer accept
* Must send new invitation to re-invite
**Permanent Action**: Removing users or canceling invitations cannot be undone. The user must be re-invited to regain access.
## Sending Password Reset Links
Help team members reset their passwords without admin intervention.
**Process**:
1. Find user card (must be Active, not Pending)
2. Click "Send reset link" button
3. Confirmation modal appears:
* Title: "Send Password Reset Link"
* Message: "Send password reset link to \[email]?"
* Buttons: "Send" or "Cancel"
4. Click "Send" to confirm
5. Password reset email sent
6. Success notification appears
**Email Contents**:
* Password reset link
* Expiration time (usually 1 hour)
* Instructions
**User Resets Password**:
1. Click link in email
2. Enter new password
3. Confirm new password
4. Password updated
5. Redirected to login
**Self-Service**: Users can request password resets themselves via the login page. This admin feature is for helping users who haven't received or can't find the reset email.
## Seat Limits
Organization plans have seat limits for team members.
### Understanding Seat Limits
**Seat Calculation**:
* **Active Users**: Count towards limit
* **Pending Invitations**: Count towards limit
* **Owner**: Always counts (cannot be removed)
**Plan Limits**:
* Starter: 3 seats
* Professional: 10 seats
* Enterprise: Unlimited (or custom limit)
**Current Usage Display**:
* Shown in Limit Reached modal
* Format: "X / Y seats used"
### Limit Reached Modal
**Triggered When**:
* Clicking "Invite User" when at seat limit
* Attempting to invite beyond limit
**Modal Contents**:
* Title: "Seat Limit Reached"
* Message: "You've reached your plan's seat limit"
* Current usage: "X / Y seats"
* Upgrade prompt (if applicable)
* Buttons: "Upgrade Plan" or "Close"
**Actions**:
* **Upgrade Plan**: Redirects to billing page (if permission)
* **Close**: Closes modal
* **Remove Users**: Free up seats by removing inactive users
**Manage Seats**: Remove inactive users or pending invitations to free up seats without upgrading.
## Permissions
Different permissions control access to team management:
| Permission | Can View Users | Can Invite | Can Edit Permissions | Can Remove Users | Can Send Reset Links |
| ------------------- | -------------- | ---------- | ----------------------- | ---------------- | -------------------- |
| **Admin** | ✅ Yes | ✅ Yes | ✅ Yes (including Admin) | ✅ Yes | ✅ Yes |
| **User Management** | ✅ Yes | ✅ Yes | ✅ Yes (except Admin) | ✅ Yes | ✅ Yes |
| **Other Roles** | ❌ No | ❌ No | ❌ No | ❌ No | ❌ No |
**Admin Assignment**: Only Admins can grant or revoke Admin permission. Users with User Management permission cannot modify Admin status.
## Common Use Cases
### Onboarding New Team Member
1. Navigate to **Platform** → **Users**
2. Click **"Invite User"**
3. Enter team member's email
4. Select appropriate permissions:
* New analyst: Reports, Dashboard
* Sales manager: Sales, Dashboard, Reports
* Full access: Admin (grants all)
5. Click **"Send Invitation"**
6. Inform team member to check email
7. Wait for acceptance (card shows "Active" when done)
### Promoting User to Admin
1. Find user card
2. Click **"Permissions"** to expand
3. Check **"Admin"** checkbox
4. Confirmation modal appears
5. Click **"Grant"**
6. User now has full access (green dot on avatar)
### Demoting Admin to Regular User
1. Find admin user card (has green dot)
2. Expand permissions
3. Uncheck **"Admin"** checkbox
4. Confirmation modal appears
5. Click **"Revoke"**
6. User keeps other permissions, loses Admin status
7. Green dot disappears from avatar
### Removing Inactive User
1. Find inactive user card
2. Click **"Revoke"** button
3. Confirmation: "Remove \[email] from organization?"
4. Click red **"Revoke"** to confirm
5. User removed, seat freed up
### Troubleshooting Forgotten Password
1. User contacts you about forgotten password
2. Find their card in Users page
3. Click **"Send reset link"** button
4. Confirm sending
5. User checks email for reset link
6. User resets password via link
### Managing Seat Limits
1. Check current usage (number of active + pending users)
2. If at limit:
* **Option 1**: Remove inactive/pending users
* **Option 2**: Purchase additional seats via [Platform → Billing](/platform/billing/billing)
* **Option 3**: Upgrade plan via [Platform → Billing](/platform/billing/billing)
3. Invite new user after freeing seats
## Troubleshooting
### Can't Access Users Page
**Reasons**:
* No User Management permission
* Not an Admin
**Fix**:
* Request User Management permission from Admin
* Ask owner to grant Admin role
### Invite Button Disabled ("Limit reached")
**Reasons**:
* Seat limit reached
* No billing permission to upgrade
**Fix**:
* Remove inactive users or cancel pending invitations
* Purchase additional seats via [Platform → Billing](/platform/billing/billing)
* Upgrade plan via [Platform → Billing](/platform/billing/billing)
* Contact organization owner
### Can't Modify Admin Permission
**Reasons**:
* User has User Management permission (not Admin)
* Cannot grant/revoke Admin without being Admin
**Fix**:
* Request Admin permission
* Ask current Admin to make the change
### Permission Changes Not Saving
**Check**:
* Network connection stable
* User is Active (not Pending)
* You have permission to edit that role
**Try**:
* Refresh page
* Clear browser cache
* Check browser console for errors
* Try again
### User Can't Accept Invitation
**Common Issues**:
1. **Wrong Email**: Must log in with invited email
* Solution: Log out, use correct email
2. **Invitation Expired**: Link no longer valid
* Solution: Cancel old invitation, send new one
3. **Already Accepted**: Link already used
* Solution: User should log in normally
4. **Email Not Received**: Spam folder or typo
* Solution: Check spam, verify email address, resend
### Send Reset Link Not Working
**Reasons**:
* User status is "Pending" (must be Active)
* Email service temporarily unavailable
* User's email invalid
**Fix**:
* Wait for user to accept invitation first
* Try again in a few minutes
* Verify email address is correct
* Check with user if email was received (spam folder)
## Next Steps
Give team members appropriate permissions
Clean up old users to free seats
Get more seats if needed
Add new team members to your organization
Review user activity and permission changes
**Security Best Practice**: Follow the principle of least privilege - give team members only the permissions they need to do their job. Review permissions regularly and remove unnecessary access.
Comprehensive team member management including invitations, role assignments, permission control, and user administration.
## Accessing Team Management
Navigate to **Platform** → **Users** from the sidebar to access team management.
**Permission Required**: User Management permission or Admin access required to view and manage team members.
## Page Layout
### Page Header
* **Title**: "Users"
* **Invite User Button**: Top right (primary blue button, rounded)
* Disabled if seat limit reached (shows "Limit reached")
* Opens Invite User modal
### Users Grid
* Masonry grid layout (responsive columns)
* User cards with permissions and actions
* Sorted: Active users first, then by email alphabetically
### Empty State
* Icon: Users icon
* Title: "No users yet"
* Message: "Get started by inviting your first user"
* Action: "Invite User" button
## User Cards
Masonry grid of user cards with comprehensive user information.
### Grid Layout
**Responsive Columns**:
* Desktop (>1280px): 3 columns
* Tablet (1024-1280px): 2 columns
* Mobile (\<640px): 1 column
**Auto-height**: Cards adjust height based on content (permissions expanded/collapsed)
### Card Structure
Each user card displays:
#### Header Section
**User Information (Left)**:
* **Email Address**: Primary identifier (bold, medium text)
* **Status Badge**: Active (green) or Pending (yellow) with dot indicator
* **Joined Date**: "Joined DD/MM/YYYY" format
* **Last Session**: "Last session X ago" (active users only)
**Avatar (Right)**:
* 40×40px circular avatar
* Shows uploaded profile picture or default user icon
* **Admin Indicator**: Green dot badge on bottom-right if user has Admin role
**Admin Visual**: Users with Admin role have a small green indicator dot on their avatar for quick identification.
#### Permissions Section
**Collapsible Permissions**:
* **Header**: "Permissions" label with up/down chevron
* **Click to Expand**: Shows full permissions tree
* **Default**: Collapsed (click to expand)
**When Expanded**:
* Full permissions tree with all roles
* Checkboxes for each permission
* Nested structure (Admin → Sub-roles)
* Real-time toggle (optimistic updates)
**Permissions Tree Structure**:
```
☑ Admin
├─ Valuations
│ ├☑ Dashboard
│ ├─ Valuations
│ │ ├☑ Edit Sales Value
│ │ ├☑ Edit Transfer Value
│ │ ├☑ Edit Marketing Value
│ │ └☑ Edit Brand Value
│ ├☑ Reports
│ └☑ Methods
├─ Sponsorships
│ ├☑ Sponsors
│ ├☑ Packages
│ ├☑ Library
│ ├☑ Proposals
│ └☑ Analytics
└─ Platform
├☑ Users
├─ Settings
│ ├☑ General
│ ├☑ SSO
│ └─ Advanced
│ └☑ Audit Log
├☑ Billing
├☑ Plugins
└☑ API
☐ Approver (independent permission, not under Admin)
```
**Admin Auto-Check**: Enabling Admin automatically grants all sub-permissions. Disabling Admin only removes the Admin flag, keeping other permissions intact.
#### Actions Section
**Two Action Buttons** (bottom of card):
**Send Reset Link** (Left):
* Text: "Send reset link"
* Action: Sends password reset email to user
* **Disabled**: For pending invitations (not yet active)
* Confirmation modal: "Send Password Reset Link"
**Revoke** (Right):
* Text: "Revoke" (red text)
* Action: Removes user from organization or cancels invitation
* **Active Users**: "Remove User" confirmation
* **Pending Invitations**: "Cancel Invitation" confirmation
* Destructive action (requires confirmation)
## Invite User
Add new team members to your organization via email invitation.
### Opening Invite Modal
**Triggers**:
* Click "Invite User" button (page header)
* Click "Invite User" in empty state
* Keyboard shortcut (if configured)
**Seat Limit Check**:
* If limit reached: Shows "Limit Reached" modal instead
* If under limit: Opens Invite User modal
### Invite User Modal
**Modal Structure**:
* Title: "Invite User"
* Close button (X, top right)
* Email input field
* Permissions tree selector
* Cancel and Send Invitation buttons
**Email Field**:
* Label: "Email Address"
* Placeholder: "[colleague@company.com](mailto:colleague@company.com)"
* Validation: Must be valid email format
* Required field
**Permissions Tree Selector**:
* Same structure as user card permissions
* Pre-select appropriate roles
* **Admin Auto-Select**: Checking Admin checks all sub-roles
* **Approver**: Independent checkbox (not under Admin)
**Action Buttons**:
* **Cancel**: Close without sending
* **Send Invitation**: Send invitation email (primary blue button)
### Invitation Process
**Step 1: Submit Invitation**:
1. Enter email address
2. Select permissions/roles
3. Click "Send Invitation"
4. Modal closes on success
**Step 2: Invitation Sent**:
* User added to grid with "Pending" status (yellow badge)
* Invitation email sent to recipient
* Card shows pending state (no "Send reset link" button)
**Step 3: Recipient Receives Email**:
* Email contains:
* Organization name
* Inviter's name
* Assigned roles/permissions
* Invitation link
* Expiration date
**Step 4: Recipient Accepts**:
* Click invitation link
* Log in or sign up with same email
* Accept invitation
* User status changes to "Active" (green badge)
* Card enables all features
**Email Match Required**: Recipients must use the exact email address that received the invitation. Invitations cannot be transferred to different addresses.
## Managing Permissions
Control what team members can access and do in your organization.
### Permission Roles
**Admin**:
* Full access to everything
* Can manage all users and settings
* Automatically includes all sub-permissions
* Green indicator dot on avatar
**Dashboard**:
* View dashboard overview
* See organization metrics
**Reports**:
* Access valuation reports
* View analytics
**Sales (CFO)**:
* Manage sales value in valuations
* View financial data
**Transfer**:
* Manage player transfers
* Edit transfer values
**Marketing**:
* Manage marketing value
* Edit media data
**Brand**:
* Manage brand indicators
* Edit brand multiplier
**Users**:
* Invite and manage team members
* Assign permissions (except Admin)
* Remove users
**Billing**:
* Access billing page
* Manage subscription
* View invoices
**Settings**:
* Edit organization settings
* Configure defaults
**Plugins**:
* Enable/disable plugins
* Configure integrations
**Audit Log** (Enterprise only):
* View audit trail
* Export logs
**API**:
* Create API keys
* Manage API access
**Approver** (Independent):
* Approve valuations
* Review reports
* Not auto-granted with Admin
**Granular Control**: Assign only the permissions each team member needs. Follow principle of least privilege for security.
### Granting Permissions
**Method 1: During Invitation**:
1. Open Invite User modal
2. Check desired permissions in tree
3. Send invitation
4. User receives those permissions on acceptance
**Method 2: Edit Existing User**:
1. Find user card
2. Click "Permissions" to expand
3. Check/uncheck permissions
4. Changes save automatically (optimistic update)
5. Confirmation modal appears for each change
**Permission Change Confirmation**:
* Title: "Grant Permission" or "Revoke Permission"
* Message: "Grant '\[Role Name]' permission to \[email]?"
* Buttons: "Grant"/"Revoke" (destructive for revoke) or "Cancel"
**Instant Updates**: Permission changes apply immediately with optimistic UI updates. If the server request fails, changes are reverted automatically.
### Revoking Permissions
**Process**:
1. Expand permissions on user card
2. Uncheck permission checkbox
3. Confirmation modal appears
4. Click "Revoke" to confirm
5. Permission removed instantly (optimistic update)
**Special Cases**:
* **Admin Removal**: Removes only Admin flag, keeps other permissions
* **All Permissions**: Removing all permissions leaves user with no access (valid state)
* **Pending Users**: Cannot modify permissions (must wait for acceptance)
### Permission Hierarchy
**Admin Behavior**:
* **Granting Admin**: Automatically grants all sub-permissions
* **Revoking Admin**: Only removes Admin flag, preserves other permissions
* **Manual Grant All**: If user has all sub-permissions, Admin is auto-granted
**Example Scenarios**:
**Scenario 1: Grant Admin**
* Before: User has \[Reports, Sales]
* Action: Check Admin
* After: User has \[Admin, Dashboard, Reports, Sales, Transfer, Marketing, Brand, Users, Billing, Settings, Plugins, Log, API]
**Scenario 2: Revoke Admin**
* Before: User has \[Admin, Dashboard, Reports, Sales, ... all]
* Action: Uncheck Admin
* After: User has \[Dashboard, Reports, Sales, ... all except Admin]
**Scenario 3: Grant All Manually**
* Before: User has \[Dashboard, Reports, Sales, Transfer, Marketing, Brand, Users, Billing]
* Action: Check Settings, Plugins, Log, API (now has all)
* After: User automatically gets \[Admin, ... all]
## Removing Users
Remove team members or cancel pending invitations.
### Removing Active Users
**Process**:
1. Find user card
2. Click "Revoke" button (red text)
3. Confirmation modal appears:
* Title: "Remove User"
* Message: "Remove \[email] from organization?"
* Buttons: "Revoke" (red) or "Cancel"
4. Click "Revoke" to confirm
5. User removed from organization
6. Card disappears from grid
**What Happens**:
* User loses access to organization immediately
* User's data (valuations, edits) remains intact
* User receives notification email (optional)
* Can be re-invited later
### Canceling Pending Invitations
**Process**:
1. Find pending user card (yellow "Pending" badge)
2. Click "Revoke" button
3. Confirmation modal appears:
* Title: "Cancel Invitation"
* Message: "Cancel invitation for \[email]?"
* Buttons: "Cancel" (red) or "Cancel" (gray)
4. Click red "Cancel" to confirm
5. Invitation cancelled
6. Card disappears from grid
**What Happens**:
* Invitation link becomes invalid
* Pending user can no longer accept
* Must send new invitation to re-invite
**Permanent Action**: Removing users or canceling invitations cannot be undone. The user must be re-invited to regain access.
## Sending Password Reset Links
Help team members reset their passwords without admin intervention.
**Process**:
1. Find user card (must be Active, not Pending)
2. Click "Send reset link" button
3. Confirmation modal appears:
* Title: "Send Password Reset Link"
* Message: "Send password reset link to \[email]?"
* Buttons: "Send" or "Cancel"
4. Click "Send" to confirm
5. Password reset email sent
6. Success notification appears
**Email Contents**:
* Password reset link
* Expiration time (usually 1 hour)
* Instructions
**User Resets Password**:
1. Click link in email
2. Enter new password
3. Confirm new password
4. Password updated
5. Redirected to login
**Self-Service**: Users can request password resets themselves via the login page. This admin feature is for helping users who haven't received or can't find the reset email.
## Seat Limits
Organization plans have seat limits for team members.
### Understanding Seat Limits
**Seat Calculation**:
* **Active Users**: Count towards limit
* **Pending Invitations**: Count towards limit
* **Owner**: Always counts (cannot be removed)
**Plan Limits**:
* Starter: 3 seats
* Professional: 10 seats
* Enterprise: Unlimited (or custom limit)
**Current Usage Display**:
* Shown in Limit Reached modal
* Format: "X / Y seats used"
### Limit Reached Modal
**Triggered When**:
* Clicking "Invite User" when at seat limit
* Attempting to invite beyond limit
**Modal Contents**:
* Title: "Seat Limit Reached"
* Message: "You've reached your plan's seat limit"
* Current usage: "X / Y seats"
* Upgrade prompt (if applicable)
* Buttons: "Upgrade Plan" or "Close"
**Actions**:
* **Upgrade Plan**: Redirects to billing page (if permission)
* **Close**: Closes modal
* **Remove Users**: Free up seats by removing inactive users
**Manage Seats**: Remove inactive users or pending invitations to free up seats without upgrading.
## Permissions
Different permissions control access to team management:
| Permission | Can View Users | Can Invite | Can Edit Permissions | Can Remove Users | Can Send Reset Links |
| ------------------- | -------------- | ---------- | ----------------------- | ---------------- | -------------------- |
| **Admin** | ✅ Yes | ✅ Yes | ✅ Yes (including Admin) | ✅ Yes | ✅ Yes |
| **User Management** | ✅ Yes | ✅ Yes | ✅ Yes (except Admin) | ✅ Yes | ✅ Yes |
| **Other Roles** | ❌ No | ❌ No | ❌ No | ❌ No | ❌ No |
**Admin Assignment**: Only Admins can grant or revoke Admin permission. Users with User Management permission cannot modify Admin status.
## Common Use Cases
### Onboarding New Team Member
1. Navigate to **Platform** → **Users**
2. Click **"Invite User"**
3. Enter team member's email
4. Select appropriate permissions:
* New analyst: Reports, Dashboard
* Sales manager: Sales, Dashboard, Reports
* Full access: Admin (grants all)
5. Click **"Send Invitation"**
6. Inform team member to check email
7. Wait for acceptance (card shows "Active" when done)
### Promoting User to Admin
1. Find user card
2. Click **"Permissions"** to expand
3. Check **"Admin"** checkbox
4. Confirmation modal appears
5. Click **"Grant"**
6. User now has full access (green dot on avatar)
### Demoting Admin to Regular User
1. Find admin user card (has green dot)
2. Expand permissions
3. Uncheck **"Admin"** checkbox
4. Confirmation modal appears
5. Click **"Revoke"**
6. User keeps other permissions, loses Admin status
7. Green dot disappears from avatar
### Removing Inactive User
1. Find inactive user card
2. Click **"Revoke"** button
3. Confirmation: "Remove \[email] from organization?"
4. Click red **"Revoke"** to confirm
5. User removed, seat freed up
### Troubleshooting Forgotten Password
1. User contacts you about forgotten password
2. Find their card in Users page
3. Click **"Send reset link"** button
4. Confirm sending
5. User checks email for reset link
6. User resets password via link
### Managing Seat Limits
1. Check current usage (number of active + pending users)
2. If at limit:
* **Option 1**: Remove inactive/pending users
* **Option 2**: Purchase additional seats via [Platform → Billing](/platform/billing/billing)
* **Option 3**: Upgrade plan via [Platform → Billing](/platform/billing/billing)
3. Invite new user after freeing seats
## Troubleshooting
### Can't Access Users Page
**Reasons**:
* No User Management permission
* Not an Admin
**Fix**:
* Request User Management permission from Admin
* Ask owner to grant Admin role
### Invite Button Disabled ("Limit reached")
**Reasons**:
* Seat limit reached
* No billing permission to upgrade
**Fix**:
* Remove inactive users or cancel pending invitations
* Purchase additional seats via [Platform → Billing](/platform/billing/billing)
* Upgrade plan via [Platform → Billing](/platform/billing/billing)
* Contact organization owner
### Can't Modify Admin Permission
**Reasons**:
* User has User Management permission (not Admin)
* Cannot grant/revoke Admin without being Admin
**Fix**:
* Request Admin permission
* Ask current Admin to make the change
### Permission Changes Not Saving
**Check**:
* Network connection stable
* User is Active (not Pending)
* You have permission to edit that role
**Try**:
* Refresh page
* Clear browser cache
* Check browser console for errors
* Try again
### User Can't Accept Invitation
**Common Issues**:
1. **Wrong Email**: Must log in with invited email
* Solution: Log out, use correct email
2. **Invitation Expired**: Link no longer valid
* Solution: Cancel old invitation, send new one
3. **Already Accepted**: Link already used
* Solution: User should log in normally
4. **Email Not Received**: Spam folder or typo
* Solution: Check spam, verify email address, resend
### Send Reset Link Not Working
**Reasons**:
* User status is "Pending" (must be Active)
* Email service temporarily unavailable
* User's email invalid
**Fix**:
* Wait for user to accept invitation first
* Try again in a few minutes
* Verify email address is correct
* Check with user if email was received (spam folder)
## Next Steps
Give team members appropriate permissions
Clean up old users to free seats
Get more seats if needed
Add new team members to your organization
Review user activity and permission changes
**Security Best Practice**: Follow the principle of least privilege - give team members only the permissions they need to do their job. Review permissions regularly and remove unnecessary access.