> ## Documentation Index
> Fetch the complete documentation index at: https://docs.valiyou.com/llms.txt
> Use this file to discover all available pages before exploring further.
# User Profile
> Complete guide to managing your personal profile, avatar, security settings, linked accounts, and account deletion
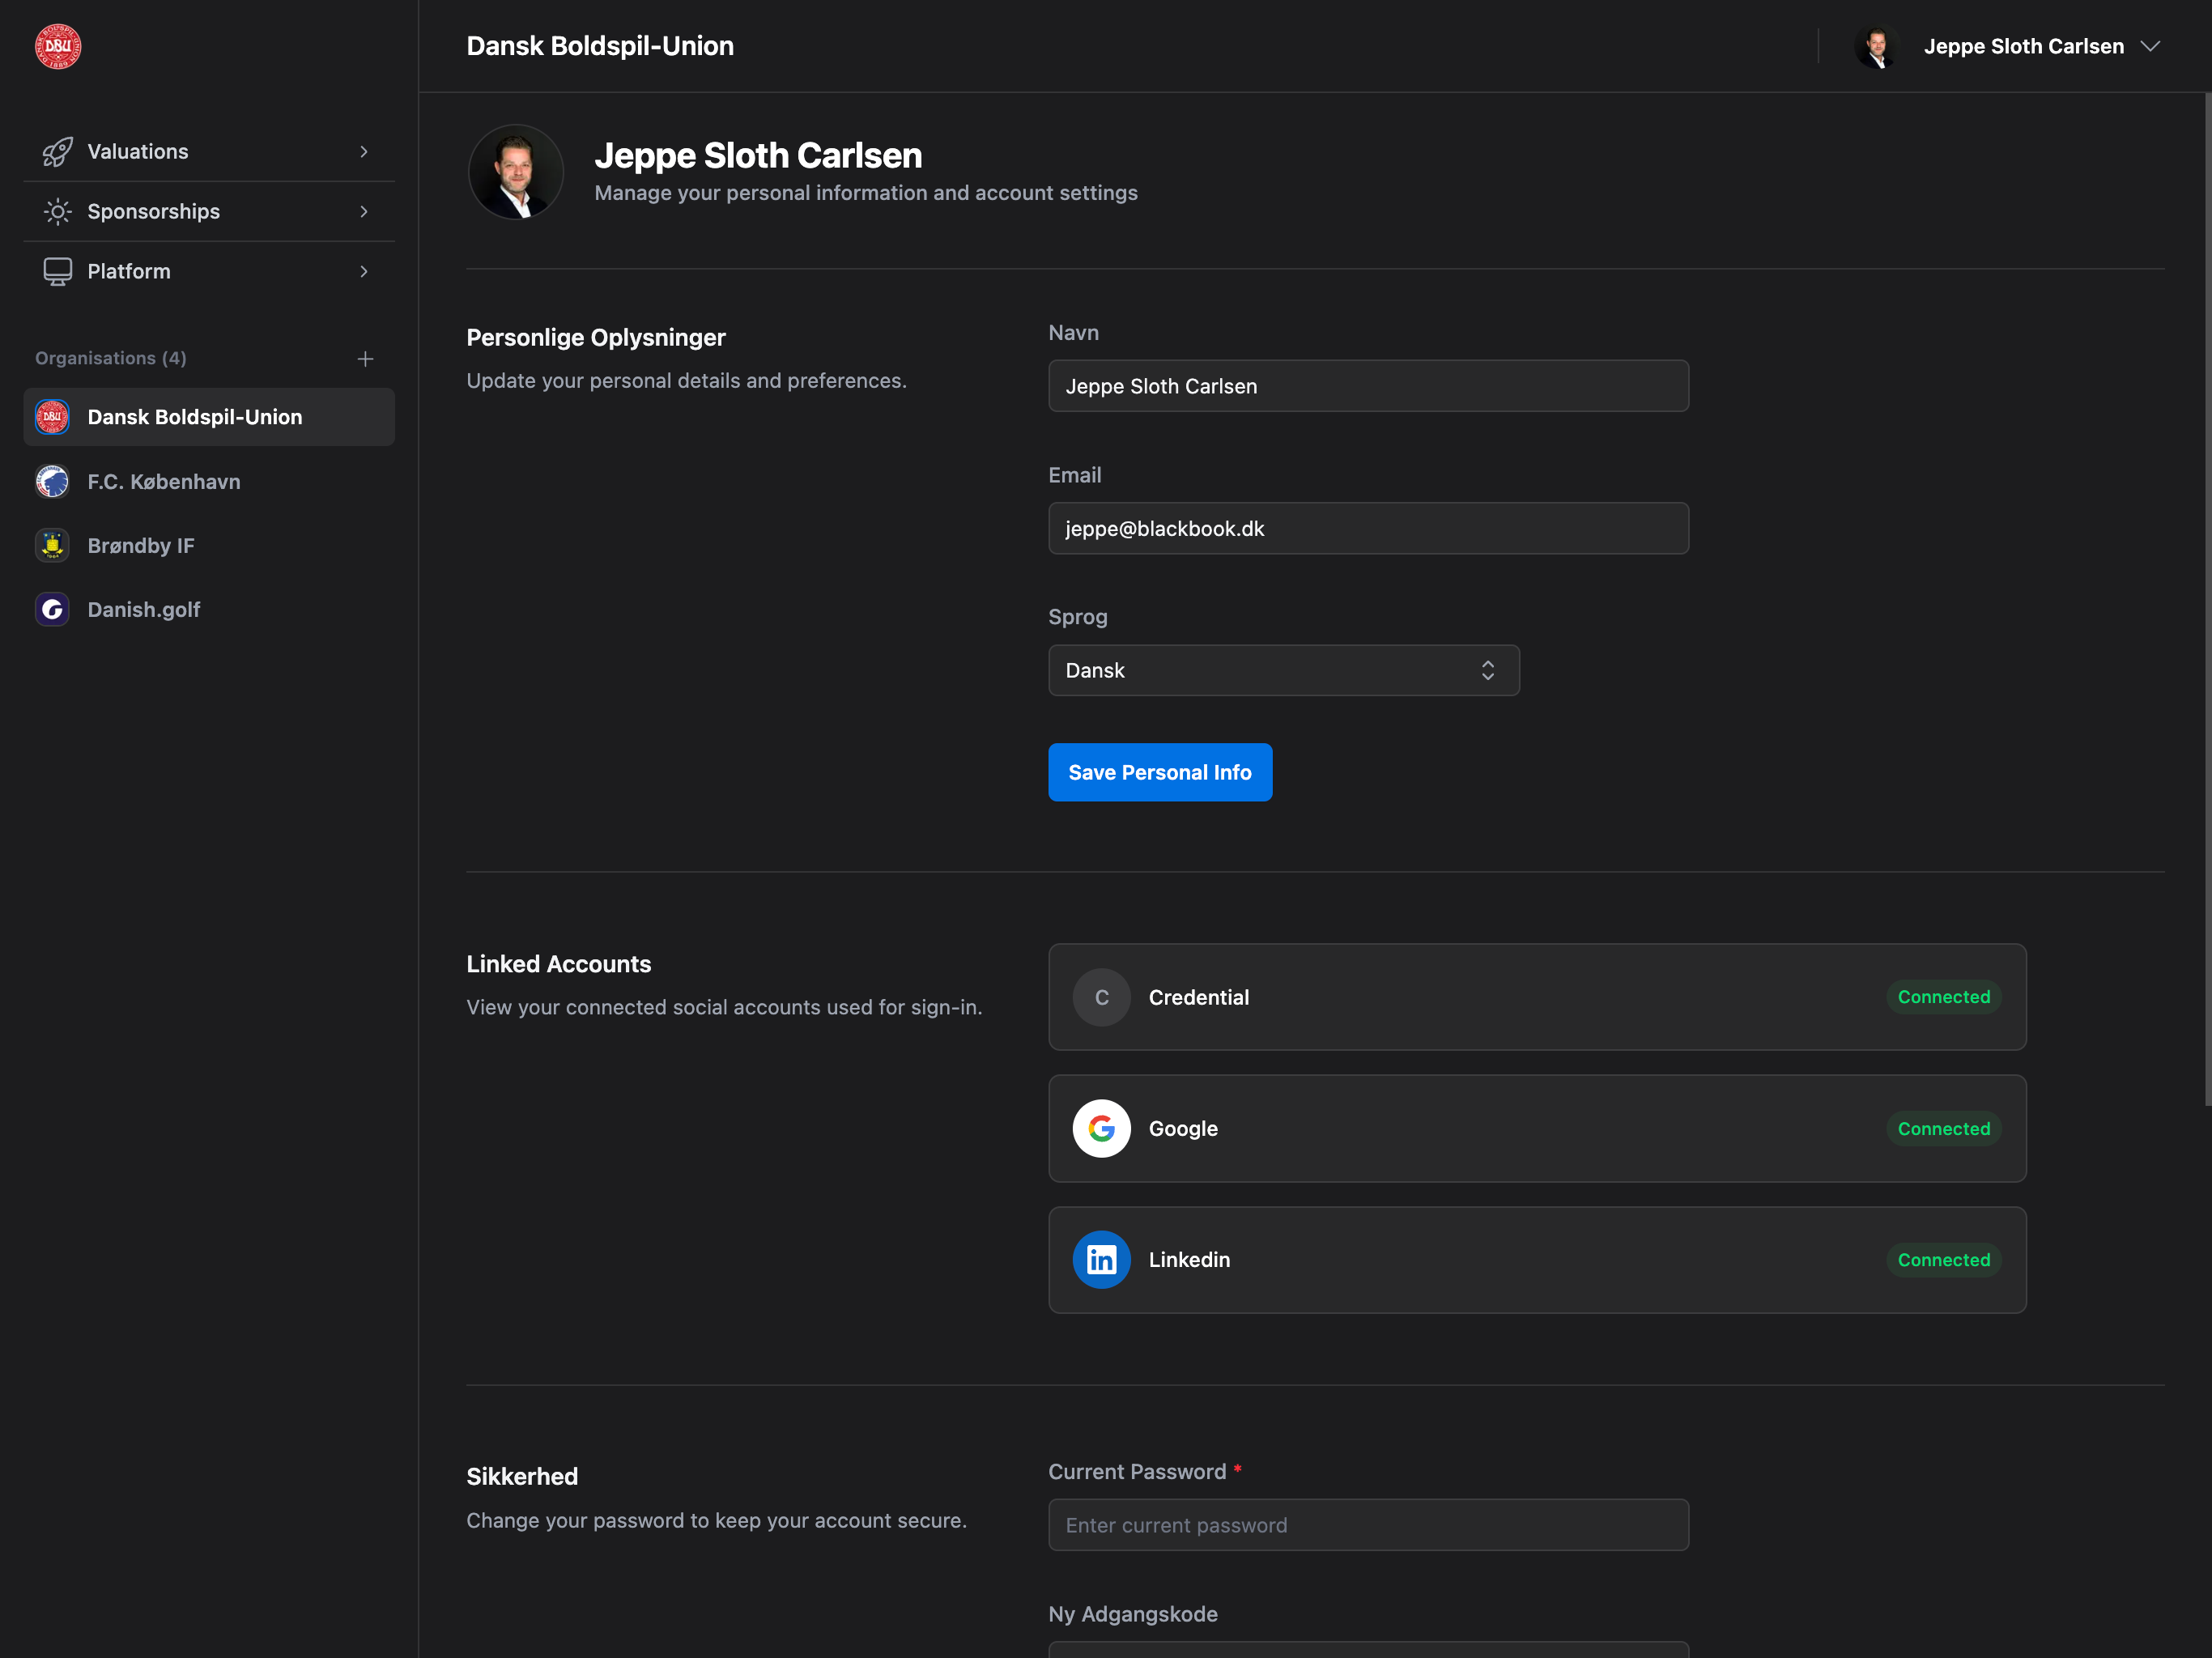 Comprehensive profile management including personal information, avatar uploads, password security, social login connections, and account deletion options.
## Accessing Your Profile
Navigate to your profile settings by clicking your **avatar** in the top right corner and selecting **"Profile"**.
**Quick Access**: Your profile is always accessible from the top navigation bar across all pages.
## Profile Avatar
Your avatar appears throughout the platform in the top bar, comments, activity logs, team member lists, and audit trails.
### Avatar Display Locations
**Where Your Avatar Appears**:
* Top navigation bar (right corner)
* Team member cards in Users page
* Comments on valuations and reports
* Audit log entries
* Invitation emails (when inviting others)
* Activity feeds and notifications
**Default Avatar**:
* If no avatar is uploaded, your initials are displayed
* Initials are extracted from your full name
* Background color is automatically generated based on your user ID
### Upload Avatar
**Step 1: Open Upload Modal**
1. Navigate to **Profile** page
2. Click the **avatar circle** at the top of the page
3. Upload modal opens
**Step 2: Select Image**
* Click "Choose File" or drag & drop image onto avatar circle
* **Supported Formats**: JPG, PNG, GIF, WebP, SVG
* **Max File Size**: 2MB
* **Recommended**: Square images (1:1 aspect ratio) for best results
**Step 3: Crop and Adjust**
* Image preview opens in crop tool
* Drag corners to adjust crop area
* Move image within circle to reposition
* Zoom in/out with scroll wheel or pinch gesture
* Preview shows final circular avatar
**Step 4: Save**
* Click **"Save"** button to apply changes
* Avatar updates immediately across platform
* New avatar visible in top bar and all other locations
**Drag & Drop**: You can drag an image file directly from your desktop onto the avatar circle for quick upload. No need to click first!
**Image Processing**: Images are automatically resized and optimized for web display. Circular cropping is applied automatically to all avatars for consistency.
### Edit Existing Avatar
To modify your current avatar:
1. Click your **avatar circle** on Profile page
2. Crop modal opens with your current image loaded
3. Adjust crop area, zoom, or position
4. Click **"Save"** to update
5. Changes apply immediately
**Re-crop Anytime**: You can re-crop your existing avatar without re-uploading. This is useful if you want to adjust the framing.
### Remove Avatar
To delete your avatar and return to initials:
1. Click your **avatar circle**
2. Crop modal opens
3. Click **"Delete"** button (red, at bottom)
4. Confirm removal in dialog
5. Avatar removed, initials displayed instead
**What Happens After Removal**:
* Avatar image deleted from storage
* Your initials appear in all locations
* Can upload new avatar anytime
* No impact on account or permissions
### Avatar Troubleshooting
**Issue: Avatar Not Updating**
**Causes**:
* File size >2MB
* Unsupported file format
* Browser cache showing old image
* Upload interrupted
**Solutions**:
1. **Check file size**: Compress image if >2MB (use online tools)
2. **Verify format**: Use JPG, PNG, GIF, WebP, or SVG only
3. **Refresh page**: Hard refresh (Cmd+Shift+R or Ctrl+Shift+R)
4. **Clear cache**: Browser settings → Clear browsing data → Images
5. **Try different image**: Test with a smaller, simple image first
6. **Check console**: Browser DevTools → Console for error messages
**Issue: Upload Fails Silently**
**Causes**:
* Network error
* File corrupted
* Server timeout
**Solutions**:
* Check internet connection
* Try smaller file
* Retry upload after 1-2 minutes
* Try different browser
## Personal Information
Update your name, email, and language preferences.
### Name
Your full name is displayed throughout the platform.
**Where Your Name Appears**:
* Team member lists (Users page)
* Comments and activity logs
* Email notifications (as sender)
* Invitation emails (as inviter)
* Audit log entries
* Report signatures
**Updating Your Name**:
1. Edit **"Name"** field on Profile page
2. Enter your full name (first and last)
3. Click **"Save Personal Info"** at bottom
4. Name updates immediately across platform
**Name Format**:
* Accepts any characters (letters, spaces, accents, etc.)
* No length limit (reasonable names expected)
* Initials extracted for avatar (first + last name initial)
**Professional Display**: Use your full professional name for clarity in team communications and official reports.
### Email Address
Your email is your primary account identifier and communication channel.
**Email Used For**:
* **Account login** (if using email/password)
* **Password reset** (receive reset links)
* **Important notifications** (subscription, billing, security)
* **Team invitations** (when others invite you)
* **System alerts** (downtime, maintenance)
**Updating Email**:
1. Edit **"Email"** field on Profile page
2. Enter new email address
3. Click **"Save Personal Info"**
4. **Verification email sent** to new address
5. Check inbox and click verification link
6. New email becomes active after verification
**Email Change Verification**: When you change your email address, you must verify the new email before it becomes active. Check your inbox (and spam folder) for a verification email. Your old email remains active until verification is complete.
**Email Verification Process**:
1. Change email on Profile page
2. Verification email sent to new address
3. Email contains verification link (expires after 24 hours)
4. Click link to verify
5. Redirected to confirmation page
6. New email now active for login
**Multiple Emails**:
* Only one email per account
* Cannot have multiple active emails
* Can link multiple social accounts (Google, Microsoft, LinkedIn) to same email
### Language
Choose your preferred language for the platform interface.
**Available Languages**:
* **English** - Full platform in English
* **Dansk** (Danish) - Full platform in Danish
**What Language Affects**:
* ✅ All menus and navigation
* ✅ Form labels and buttons
* ✅ System messages and notifications
* ✅ Report labels and column headers
* ✅ Email notifications
* ✅ Error messages
* ✅ Help text and tooltips
* ❌ User-generated content (valuations, comments, etc.)
* ❌ Other users' language settings
**Changing Language**:
1. Select language from **"Language"** dropdown
2. Click **"Save Personal Info"**
3. Language changes **immediately** (no page refresh needed)
4. All text updates to selected language
**Personal Setting**: Language changes apply only to your account, not your organization. Each team member can use their preferred language independently.
**Language Troubleshooting**:
* If text doesn't change: Hard refresh page (Cmd+Shift+R)
* If mixed languages appear: Clear browser cache
* If language reverts: Save button may not have been clicked
### Save Personal Info Button
**Location**: Bottom of Personal Information section
**What It Saves**:
* Name changes
* Email changes (triggers verification)
* Language changes
**Button States**:
* **Enabled**: Changes detected, ready to save
* **Disabled**: No changes made, or saving in progress
* **Loading**: "Saving..." with spinner
**After Saving**:
* Success message appears: "Profile updated successfully"
* Changes apply immediately
* Page does not refresh (seamless update)
## Linked Accounts
View and manage all authentication providers connected to your Valiyou account.
### What Are Linked Accounts?
Linked accounts allow you to sign in to Valiyou using different authentication methods (social logins) without creating separate accounts. All linked accounts access the same profile, organizations, and data.
**Benefits**:
* **Multiple sign-in options** - Use Google, Microsoft, LinkedIn, or email/password
* **No separate accounts** - All providers access same data
* **Convenience** - Sign in with your preferred method
* **Security** - Use provider's 2FA and security features
### Supported Providers
#### Google
* **Icon**: Google logo (multi-color)
* **Sign In**: "Sign in with Google"
* **Account Type**: Personal (@gmail.com) or Workspace
* **Status**: "Connected" badge if linked
#### Microsoft
* **Icon**: Microsoft logo (blue/orange/green/yellow)
* **Sign In**: "Sign in with Microsoft"
* **Account Type**: Personal (@outlook.com, @hotmail.com) or Microsoft 365
* **Status**: "Connected" badge if linked
#### LinkedIn
* **Icon**: LinkedIn logo (blue)
* **Sign In**: "Sign in with LinkedIn"
* **Account Type**: LinkedIn profile
* **Status**: "Connected" badge if linked
#### Email/Password (Credentials)
* **Icon**: Email/lock icon
* **Sign In**: Traditional email + password login
* **Status**: "Connected" if password is set
* **Note**: Only method that allows password management
### How Linked Accounts Work
**Account Linking Logic**:
1. **Primary Email Matching**: Accounts are linked if they use the same email address
2. **First Sign-Up Method**: Your first login method determines the initial account
3. **Subsequent Logins**: Using different providers with same email links them automatically
4. **Unified Profile**: All providers access same user profile and organizations
**Example Scenario**:
1. Sign up with Google ([user@example.com](mailto:user@example.com))
2. Later, sign in with Microsoft ([user@example.com](mailto:user@example.com))
3. System detects same email → Links Microsoft account
4. Now can sign in with either Google or Microsoft
5. Both access same profile, valuations, organizations
**Multiple Providers**:
* Can have multiple providers linked simultaneously
* Each provider shown in Linked Accounts section
* "Connected" badge indicates active links
* Can sign in with any linked provider
**Primary Email**: Your primary email address is determined by the first account you used to sign up. You can change your primary email in Personal Information, but linked accounts remain connected.
### Viewing Linked Accounts
**Linked Accounts Section** shows all authentication methods.
**For Each Provider**:
* **Logo**: Official provider branding
* **Name**: Provider name (Google, Microsoft, LinkedIn, Email/Password)
* **Status**:
* "Connected" (green badge) - Provider is linked
* "Not Connected" (gray text) - Provider not linked
* **Email**: Email address used for this provider (if connected)
**Layout**:
* Grid of provider cards (2 columns on desktop, 1 on mobile)
* Connected providers shown first
* Consistent visual styling
### Linking New Accounts
To link a new authentication provider:
1. **Sign Out** of current session
2. Go to login page
3. Click **"Sign in with \[Provider]"** (e.g., "Sign in with Microsoft")
4. **Use same email address** as your existing account
5. Complete provider's authentication
6. System detects matching email
7. Accounts automatically linked
8. Redirected to dashboard
**Important**: Email addresses must match exactly for automatic linking.
**Email Mismatch**: If you sign in with a different provider using a **different email address**, a new separate account will be created. To link accounts, use the same email for all providers.
### Unlinking Accounts
**Current Limitation**: Cannot unlink providers through UI.
**Why**: Ensures you always have a way to sign in. If you could unlink all providers, you'd lose access to your account.
**Workaround**: Contact [support@valiyou.com](mailto:support@valiyou.com) if you need to unlink a specific provider.
**Future Feature**: May allow unlinking if at least one provider remains linked.
## Security
Manage your account password and security settings.
**Password Section Visibility**: The Security section is only visible if you have email/password (credential) login enabled. If you only use social logins (Google, Microsoft, LinkedIn), this section will not appear.
### Password Management
Change your account password to maintain security.
#### When You Can Change Password
**Available If**:
* ✅ You signed up with email/password
* ✅ You set a password after signing up with social login
* ✅ "Email/Password" shows "Connected" in Linked Accounts
**Not Available If**:
* ❌ You only use social logins (Google, Microsoft, LinkedIn)
* ❌ No password has ever been set on account
**Social Login Only**: If you only use Google/Microsoft/LinkedIn to sign in, you don't have a Valiyou password. Password security is managed by your social provider. To set a Valiyou password, contact [support@valiyou.com](mailto:support@valiyou.com).
### Change Password Process
**Step 1: Enter Current Password**
1. Locate **"Current Password"** field
2. Enter your existing password
3. Used to verify your identity
**Step 2: Enter New Password**
1. Locate **"New Password"** field
2. Enter your desired new password
3. **Requirements**: Minimum 6 characters
4. **Recommendations**:
* Use 12+ characters for better security
* Mix uppercase, lowercase, numbers, symbols
* Avoid common passwords (password123, qwerty, etc.)
* Don't reuse passwords from other sites
**Step 3: Confirm New Password**
1. Locate **"Confirm New Password"** field
2. Re-enter the same new password
3. Must exactly match "New Password" field
4. Prevents typos
**Step 4: Save Changes**
1. Click **"Save Password"** button
2. System validates all fields:
* Current password is correct
* New password meets requirements (6+ chars)
* Confirm password matches new password
3. If validation passes, password updated
4. Success message appears
5. You remain logged in (no need to re-login)
**Password Requirements**: Passwords must be at least 6 characters long. For better security, use a strong, unique password that you don't use on other websites. Consider using a password manager.
### After Password Change
**What Happens**:
* ✅ Password updated in database (hashed securely)
* ✅ You remain logged in on current device
* ✅ Can immediately use new password
* ❌ Other active sessions are NOT revoked (still logged in on other devices)
**Security Consideration**:
* If you changed your password because of a security concern (account compromise), manually log out of all devices
* Or contact support to revoke all sessions
### Password Change Errors
**Error: "Current password is incorrect"**
**Causes**:
* Typed wrong password
* Caps Lock enabled
* Using old password
**Solutions**:
* Double-check your existing password
* Try toggling "Show Password" (if available)
* Use "Forgot Password" if you can't remember (login page)
***
**Error: "Passwords do not match"**
**Causes**:
* Confirm password field doesn't match new password
* Typo in one of the fields
**Solutions**:
* Re-enter both new password and confirm password
* Copy-paste is NOT recommended (defeats purpose of confirmation)
* Toggle "Show Password" to visually verify both fields match
***
**Error: "Password must be at least 6 characters"**
**Causes**:
* New password too short
**Solutions**:
* Use a longer password (6+ characters minimum)
* Recommend 12+ characters for good security
***
**Error: "Failed to update password"**
**Causes**:
* Network error
* Server error
* Session expired
**Solutions**:
* Check internet connection
* Refresh page and try again
* Log out and log back in
* Contact support if persists
### Password Security Best Practices
**Strong Password Tips**:
* ✅ Use 12+ characters
* ✅ Mix uppercase and lowercase letters
* ✅ Include numbers and symbols
* ✅ Use unique passwords for each site
* ✅ Use a password manager (1Password, Bitwarden, LastPass)
* ❌ Don't use personal info (name, birthday, etc.)
* ❌ Don't use common passwords (password, 123456, etc.)
* ❌ Don't reuse passwords from other sites
* ❌ Don't share passwords with others
**When to Change Password**:
* 🚨 If you suspect account compromise
* 🚨 If password was exposed in a data breach
* 🚨 If you shared password with someone
* ✅ Every 6-12 months as routine security
* ✅ If using a weak password
**Additional Security**:
* Enable 2FA on social logins (Google, Microsoft, LinkedIn)
* Use unique email address for important accounts
* Monitor Linked Accounts for unauthorized connections
* Review Audit Log regularly for suspicious activity
## Danger Zone: Delete Account
Permanently remove your Valiyou account and all associated data.
**PERMANENT ACTION**: Account deletion cannot be undone. After the 30-day grace period, all your data is permanently deleted and cannot be recovered. Proceed with extreme caution.
### What Gets Deleted
When you delete your account, the following are permanently removed after 30 days:
**Your User Data**:
* ✅ User profile (name, email, avatar)
* ✅ All linked accounts (Google, Microsoft, LinkedIn)
* ✅ Password (if set)
* ✅ Security settings
* ✅ Language preferences
**Organization Access**:
* ✅ All team memberships removed
* ✅ Access to all organizations revoked immediately
* ✅ Cannot view or edit any organization data
* ✅ Removed from Users lists in all organizations
**What Is NOT Deleted**:
* ❌ Organizations you created (must be deleted separately)
* ❌ Valuations created by you (remain in organization, attributed to "Deleted User")
* ❌ Comments and activity logs (remain for audit trail, show "Deleted User")
* ❌ Audit log entries (remain for compliance, show user ID)
**Data Attribution**: After account deletion, your past contributions (valuations, comments, edits) remain in organizations but are attributed to "Deleted User" for audit trail purposes. The actual content is preserved.
### Deletion Requirements
You **CANNOT** delete your account if:
**Sole Admin of Organizations**:
* ❌ You are the only admin of one or more organizations
* ❌ Organizations would be left without admin access
* ❌ System prevents deletion to protect organization data
**What You Must Do First**:
1. **Option A: Transfer Admin Rights**
* Go to each organization where you're sole admin
* Navigate to **Platform** → **Users**
* Promote another team member to Admin role
* Verify they have Admin access
* Then return to delete account
2. **Option B: Delete Organizations**
* Go to each organization where you're sole admin
* Navigate to **Platform** → **Organization Settings**
* Scroll to **Danger Zone**
* Delete organization (if you no longer need it)
* Then return to delete account
**Multiple Organizations**: If you're sole admin of multiple organizations, you must handle each one individually before account deletion is allowed.
### Deletion Process
**Step 1: Initiate Deletion**
1. Navigate to **Profile** page
2. Scroll to **Danger Zone** section at bottom
3. Click **"Delete Account"** button (red, destructive)
4. Deletion confirmation modal opens
**Step 2: System Check**
* System checks if you're sole admin of any organizations
* **If Yes**: Error modal appears listing organizations
* Message: "You are the only admin of the following organizations: \[List]"
* Action required: Transfer admin or delete organizations first
* Deletion blocked until resolved
* **If No**: Proceed to Step 3
**Step 3: Confirm Deletion**
1. Modal shows warning: "This action cannot be undone"
2. Lists what will be deleted (profile, access, memberships)
3. Type **DELETE** (all capital letters) in confirmation field
4. Must type exactly "DELETE" (case-sensitive)
5. Click **"Delete My Account"** button (red)
**Step 4: Grace Period Begins**
* Account marked for deletion
* **30-day grace period** starts
* You are immediately logged out
* Access to all organizations revoked
* Cannot log in (account locked)
* Email sent confirming deletion request
**Step 5: Deletion Completed**
* After 30 days, all data permanently deleted
* User profile removed from database
* Email address freed for re-use
* Linked accounts unlinked
* No recovery possible
**30-Day Grace Period**: You have 30 days to cancel the deletion by contacting [support@valiyou.com](mailto:support@valiyou.com). Provide your email address and support can restore your account. After 30 days, deletion is permanent and irreversible.
### Before Deleting Your Account
**Checklist Before Deletion**:
* [ ] Transfer admin rights to another team member (for organizations you manage)
* [ ] Or delete organizations you no longer need
* [ ] Save any important data, reports, or exports you want to keep
* [ ] Inform your team members of your departure
* [ ] Download any invoices or billing documents
* [ ] Cancel any active subscriptions (if you're billing admin)
* [ ] Export valuations or data you need for records
* [ ] Unlink any integrations (API keys, Power BI, Excel)
**Data Export Options**:
* API: Use API keys to export data before deletion
* Reports: Download PDF/Excel reports from Reports page
* Screenshots: Take screenshots of important data
* Billing: Download invoices from Billing → Invoices tab
### Alternatives to Account Deletion
Consider these alternatives before permanently deleting your account:
**Alternative 1: Leave Organizations**
* **If**: You just want to leave specific teams/organizations
* **Solution**: Ask an admin to remove you from Users page
* **Result**: You leave organization but keep account
* **Benefit**: Can rejoin later if needed
**Alternative 2: Log Out**
* **If**: You want to take a break or stop using temporarily
* **Solution**: Simply log out (no account deletion needed)
* **Result**: Account remains inactive, can log back in anytime
* **Benefit**: No data loss, easy to return
**Alternative 3: Downgrade Subscription**
* **If**: You're unhappy with cost or features
* **Solution**: Downgrade to free/starter plan
* **Result**: Keep account but reduce/eliminate costs
* **Benefit**: Can always upgrade later
**Alternative 4: Contact Support**
* **If**: You're unhappy with service or have issues
* **Solution**: Email [support@valiyou.com](mailto:support@valiyou.com) for help
* **Result**: May resolve issue without deletion
* **Benefit**: Support can often fix problems or provide alternatives
**Think Twice**: Account deletion is permanent. Consider alternatives like leaving organizations, logging out, or downgrading subscription before permanently deleting your account.
### Canceling Account Deletion
If you initiated account deletion but changed your mind:
**Within 30 Days**:
1. Email [support@valiyou.com](mailto:support@valiyou.com) immediately
2. Subject: "Cancel Account Deletion - \[Your Email]"
3. Include your registered email address
4. Support will restore your account
5. You can log back in normally
6. All data and access restored
**After 30 Days**:
* ❌ Deletion is permanent and irreversible
* ❌ No recovery possible
* ❌ Must create new account if you want to return
* ❌ All previous data lost forever
**Contact Support Quickly**: If you want to cancel deletion, contact [support@valiyou.com](mailto:support@valiyou.com) as soon as possible. Don't wait until day 29 - email immediately to ensure restoration.
## Permissions
Access to profile features based on your account status:
| Feature | All Users | Admin | Notes |
| ------------------------ | --------- | --------- | ------------------------------------- |
| **View Profile** | ✅ Yes | ✅ Yes | Everyone can access their own profile |
| **Edit Name** | ✅ Yes | ✅ Yes | Update your display name |
| **Edit Email** | ✅ Yes | ✅ Yes | Requires email verification |
| **Change Language** | ✅ Yes | ✅ Yes | Personal setting only |
| **Upload Avatar** | ✅ Yes | ✅ Yes | 2MB limit, standard formats |
| **View Linked Accounts** | ✅ Yes | ✅ Yes | See all connected auth providers |
| **Change Password** | ✅ Yes\* | ✅ Yes\* | \*Only if password is set |
| **Delete Account** | ✅ Yes\*\* | ✅ Yes\*\* | \*\*Cannot delete if sole admin |
**Personal Settings**: Profile settings are personal and do not require admin or special permissions. Everyone can manage their own profile independently.
## Common Use Cases
### Upload Profile Picture
1. Navigate to **Profile** (click avatar → Profile)
2. Click **avatar circle** at top of page
3. Drag image file onto circle (or click to browse)
4. Adjust crop area and zoom
5. Click **"Save"**
6. Avatar updates immediately throughout platform
### Change Email Address
1. Navigate to **Profile**
2. Edit **"Email"** field
3. Enter new email address
4. Click **"Save Personal Info"**
5. Check inbox for verification email
6. Click verification link in email
7. New email active after verification
### Switch Language to Danish
1. Navigate to **Profile**
2. Click **"Language"** dropdown
3. Select **"Dansk"**
4. Click **"Save Personal Info"**
5. Platform immediately switches to Danish
### Update Password
1. Navigate to **Profile**
2. Scroll to **Security** section
3. Enter **current password**
4. Enter **new password** (6+ characters)
5. Re-enter new password in **confirm** field
6. Click **"Save Password"**
7. Success message appears
### Leave an Organization
1. Ask organization admin to remove you
2. Admin goes to **Platform** → **Users**
3. Admin clicks **"Revoke"** on your user card
4. Confirm removal
5. You lose access to that organization
6. Your account remains active
### Prepare for Account Deletion
1. List all organizations where you're admin: **Platform** → **Users** (check green dot on avatar)
2. For each organization:
* **Option A**: Go to **Users**, promote another member to Admin
* **Option B**: Go to **Organization Settings** → Danger Zone → Delete Organization
3. Export important data: **Valuations** → **Reports** → Download
4. Download invoices: **Platform** → **Billing** → **Invoices** tab
5. Inform team members
6. Navigate to **Profile** → **Danger Zone**
7. Click **"Delete Account"**
8. Follow deletion process
## Troubleshooting
### Avatar Upload Issues
**Problem: Avatar Not Updating**
**Check**:
* File size ≤2MB
* Supported format (JPG, PNG, GIF, WebP, SVG)
* Internet connection stable
* Browser allows file uploads
**Solutions**:
1. Compress image (use online tools like TinyPNG)
2. Try different image format (convert to JPG)
3. Hard refresh page (Cmd+Shift+R or Ctrl+Shift+R)
4. Clear browser cache
5. Try incognito/private mode
6. Try different browser
7. Check browser console for errors (F12 → Console)
***
**Problem: Avatar Shows Old Image**
**Cause**: Browser cache
**Solution**:
* Hard refresh: Cmd+Shift+R (Mac) or Ctrl+Shift+R (Windows)
* Or clear browser cache in settings
* Or open in incognito/private window
***
**Problem: Cannot Crop Avatar**
**Cause**: Image too large, format issue, or browser compatibility
**Solutions**:
* Resize image before upload (max 2000×2000px recommended)
* Convert to JPG format
* Update browser to latest version
* Try different browser
### Email Verification Issues
**Problem: Verification Email Not Received**
**Check**:
* Spam/junk folder
* Email address typed correctly
* 5-10 minute delay normal
**Solutions**:
1. Wait 10 minutes
2. Check spam/junk folder thoroughly
3. Add [no-reply@valiyou.com](mailto:no-reply@valiyou.com) to contacts
4. Whitelist @valiyou.com domain in email settings
5. Change email again to trigger new verification
6. Try alternative email address
7. Contact [support@valiyou.com](mailto:support@valiyou.com)
***
**Problem: Verification Link Expired**
**Cause**: Links expire after 24 hours
**Solution**:
* Go back to Profile page
* Change email field again (triggers new verification)
* Check inbox for new verification email
***
**Problem: Verification Link Doesn't Work**
**Causes**:
* Link broken by email client (wrapped to multiple lines)
* Link already used
* Link expired
**Solutions**:
* Copy entire URL and paste in browser
* Request new verification (change email again)
* Contact support if persists
### Password Change Problems
**Problem: "Current password is incorrect"**
**Check**:
* Typing correct password
* Caps Lock not enabled
* Keyboard language correct
**Solutions**:
* Toggle "Show Password" if available
* Copy-paste password from password manager
* Use "Forgot Password" on login page to reset
* Ensure you're using Valiyou password (not Google/Microsoft)
***
**Problem: "Passwords do not match"**
**Cause**: Confirm password field doesn't exactly match new password
**Solutions**:
* Re-enter both fields carefully
* Toggle "Show Password" to see what you're typing
* Don't copy-paste (defeats purpose of confirmation)
***
**Problem: Password Section Not Visible**
**Cause**: You only use social login (no password set)
**Explanation**: If you signed up with Google/Microsoft/LinkedIn and never set a password, the Security section won't appear. Your password is managed by your social provider.
**Solution**: If you want to set a Valiyou password, contact [support@valiyou.com](mailto:support@valiyou.com)
### Account Deletion Problems
**Problem: Cannot Delete Account (Sole Admin)**
**Error**: "You are the only admin of the following organizations: \[List]"
**Cause**: System prevents deletion when you're the only admin of organizations
**Solutions**:
1. **Transfer Admin** (Recommended):
* Go to each listed organization
* Navigate to **Platform** → **Users**
* Find another active team member
* Expand their permissions
* Check **"Admin"** checkbox
* Confirm granting Admin
* Verify they have Admin status (green dot on avatar)
* Repeat for all organizations
* Return to Profile → Delete Account
2. **Delete Organizations**:
* Go to each listed organization
* Navigate to **Platform** → **Organization Settings**
* Scroll to **Danger Zone**
* Click **"Delete Organisation"**
* Type **DELETE** to confirm
* Organization deleted
* Repeat for all organizations
* Return to Profile → Delete Account
***
**Problem: Typed DELETE But Button Disabled**
**Causes**:
* Didn't type in all capitals: **DELETE** (not delete or Delete)
* Extra spaces before/after
* Confirmation field not focused
**Solution**:
* Clear field
* Type exactly: **DELETE** (all caps, no spaces)
* Click inside field first, then type
***
**Problem: Changed Mind After Deletion**
**Within 30 Days**:
* Email [support@valiyou.com](mailto:support@valiyou.com) immediately
* Subject: "Cancel Account Deletion"
* Include registered email address
* Support will restore account
**After 30 Days**:
* Cannot recover (deletion permanent)
* Must create new account
## Next Steps
Add avatar and verify email for complete profile
Choose your preferred language (English/Dansk)
Ensure strong password or enable 2FA on social logins
Verify all connected authentication providers
Navigate to Billing to manage subscription
**Complete Your Profile**: A complete profile with avatar and verified email helps your team members recognize you and improves communication. Take 2 minutes to update your profile now!
Comprehensive profile management including personal information, avatar uploads, password security, social login connections, and account deletion options.
## Accessing Your Profile
Navigate to your profile settings by clicking your **avatar** in the top right corner and selecting **"Profile"**.
**Quick Access**: Your profile is always accessible from the top navigation bar across all pages.
## Profile Avatar
Your avatar appears throughout the platform in the top bar, comments, activity logs, team member lists, and audit trails.
### Avatar Display Locations
**Where Your Avatar Appears**:
* Top navigation bar (right corner)
* Team member cards in Users page
* Comments on valuations and reports
* Audit log entries
* Invitation emails (when inviting others)
* Activity feeds and notifications
**Default Avatar**:
* If no avatar is uploaded, your initials are displayed
* Initials are extracted from your full name
* Background color is automatically generated based on your user ID
### Upload Avatar
**Step 1: Open Upload Modal**
1. Navigate to **Profile** page
2. Click the **avatar circle** at the top of the page
3. Upload modal opens
**Step 2: Select Image**
* Click "Choose File" or drag & drop image onto avatar circle
* **Supported Formats**: JPG, PNG, GIF, WebP, SVG
* **Max File Size**: 2MB
* **Recommended**: Square images (1:1 aspect ratio) for best results
**Step 3: Crop and Adjust**
* Image preview opens in crop tool
* Drag corners to adjust crop area
* Move image within circle to reposition
* Zoom in/out with scroll wheel or pinch gesture
* Preview shows final circular avatar
**Step 4: Save**
* Click **"Save"** button to apply changes
* Avatar updates immediately across platform
* New avatar visible in top bar and all other locations
**Drag & Drop**: You can drag an image file directly from your desktop onto the avatar circle for quick upload. No need to click first!
**Image Processing**: Images are automatically resized and optimized for web display. Circular cropping is applied automatically to all avatars for consistency.
### Edit Existing Avatar
To modify your current avatar:
1. Click your **avatar circle** on Profile page
2. Crop modal opens with your current image loaded
3. Adjust crop area, zoom, or position
4. Click **"Save"** to update
5. Changes apply immediately
**Re-crop Anytime**: You can re-crop your existing avatar without re-uploading. This is useful if you want to adjust the framing.
### Remove Avatar
To delete your avatar and return to initials:
1. Click your **avatar circle**
2. Crop modal opens
3. Click **"Delete"** button (red, at bottom)
4. Confirm removal in dialog
5. Avatar removed, initials displayed instead
**What Happens After Removal**:
* Avatar image deleted from storage
* Your initials appear in all locations
* Can upload new avatar anytime
* No impact on account or permissions
### Avatar Troubleshooting
**Issue: Avatar Not Updating**
**Causes**:
* File size >2MB
* Unsupported file format
* Browser cache showing old image
* Upload interrupted
**Solutions**:
1. **Check file size**: Compress image if >2MB (use online tools)
2. **Verify format**: Use JPG, PNG, GIF, WebP, or SVG only
3. **Refresh page**: Hard refresh (Cmd+Shift+R or Ctrl+Shift+R)
4. **Clear cache**: Browser settings → Clear browsing data → Images
5. **Try different image**: Test with a smaller, simple image first
6. **Check console**: Browser DevTools → Console for error messages
**Issue: Upload Fails Silently**
**Causes**:
* Network error
* File corrupted
* Server timeout
**Solutions**:
* Check internet connection
* Try smaller file
* Retry upload after 1-2 minutes
* Try different browser
## Personal Information
Update your name, email, and language preferences.
### Name
Your full name is displayed throughout the platform.
**Where Your Name Appears**:
* Team member lists (Users page)
* Comments and activity logs
* Email notifications (as sender)
* Invitation emails (as inviter)
* Audit log entries
* Report signatures
**Updating Your Name**:
1. Edit **"Name"** field on Profile page
2. Enter your full name (first and last)
3. Click **"Save Personal Info"** at bottom
4. Name updates immediately across platform
**Name Format**:
* Accepts any characters (letters, spaces, accents, etc.)
* No length limit (reasonable names expected)
* Initials extracted for avatar (first + last name initial)
**Professional Display**: Use your full professional name for clarity in team communications and official reports.
### Email Address
Your email is your primary account identifier and communication channel.
**Email Used For**:
* **Account login** (if using email/password)
* **Password reset** (receive reset links)
* **Important notifications** (subscription, billing, security)
* **Team invitations** (when others invite you)
* **System alerts** (downtime, maintenance)
**Updating Email**:
1. Edit **"Email"** field on Profile page
2. Enter new email address
3. Click **"Save Personal Info"**
4. **Verification email sent** to new address
5. Check inbox and click verification link
6. New email becomes active after verification
**Email Change Verification**: When you change your email address, you must verify the new email before it becomes active. Check your inbox (and spam folder) for a verification email. Your old email remains active until verification is complete.
**Email Verification Process**:
1. Change email on Profile page
2. Verification email sent to new address
3. Email contains verification link (expires after 24 hours)
4. Click link to verify
5. Redirected to confirmation page
6. New email now active for login
**Multiple Emails**:
* Only one email per account
* Cannot have multiple active emails
* Can link multiple social accounts (Google, Microsoft, LinkedIn) to same email
### Language
Choose your preferred language for the platform interface.
**Available Languages**:
* **English** - Full platform in English
* **Dansk** (Danish) - Full platform in Danish
**What Language Affects**:
* ✅ All menus and navigation
* ✅ Form labels and buttons
* ✅ System messages and notifications
* ✅ Report labels and column headers
* ✅ Email notifications
* ✅ Error messages
* ✅ Help text and tooltips
* ❌ User-generated content (valuations, comments, etc.)
* ❌ Other users' language settings
**Changing Language**:
1. Select language from **"Language"** dropdown
2. Click **"Save Personal Info"**
3. Language changes **immediately** (no page refresh needed)
4. All text updates to selected language
**Personal Setting**: Language changes apply only to your account, not your organization. Each team member can use their preferred language independently.
**Language Troubleshooting**:
* If text doesn't change: Hard refresh page (Cmd+Shift+R)
* If mixed languages appear: Clear browser cache
* If language reverts: Save button may not have been clicked
### Save Personal Info Button
**Location**: Bottom of Personal Information section
**What It Saves**:
* Name changes
* Email changes (triggers verification)
* Language changes
**Button States**:
* **Enabled**: Changes detected, ready to save
* **Disabled**: No changes made, or saving in progress
* **Loading**: "Saving..." with spinner
**After Saving**:
* Success message appears: "Profile updated successfully"
* Changes apply immediately
* Page does not refresh (seamless update)
## Linked Accounts
View and manage all authentication providers connected to your Valiyou account.
### What Are Linked Accounts?
Linked accounts allow you to sign in to Valiyou using different authentication methods (social logins) without creating separate accounts. All linked accounts access the same profile, organizations, and data.
**Benefits**:
* **Multiple sign-in options** - Use Google, Microsoft, LinkedIn, or email/password
* **No separate accounts** - All providers access same data
* **Convenience** - Sign in with your preferred method
* **Security** - Use provider's 2FA and security features
### Supported Providers
#### Google
* **Icon**: Google logo (multi-color)
* **Sign In**: "Sign in with Google"
* **Account Type**: Personal (@gmail.com) or Workspace
* **Status**: "Connected" badge if linked
#### Microsoft
* **Icon**: Microsoft logo (blue/orange/green/yellow)
* **Sign In**: "Sign in with Microsoft"
* **Account Type**: Personal (@outlook.com, @hotmail.com) or Microsoft 365
* **Status**: "Connected" badge if linked
#### LinkedIn
* **Icon**: LinkedIn logo (blue)
* **Sign In**: "Sign in with LinkedIn"
* **Account Type**: LinkedIn profile
* **Status**: "Connected" badge if linked
#### Email/Password (Credentials)
* **Icon**: Email/lock icon
* **Sign In**: Traditional email + password login
* **Status**: "Connected" if password is set
* **Note**: Only method that allows password management
### How Linked Accounts Work
**Account Linking Logic**:
1. **Primary Email Matching**: Accounts are linked if they use the same email address
2. **First Sign-Up Method**: Your first login method determines the initial account
3. **Subsequent Logins**: Using different providers with same email links them automatically
4. **Unified Profile**: All providers access same user profile and organizations
**Example Scenario**:
1. Sign up with Google ([user@example.com](mailto:user@example.com))
2. Later, sign in with Microsoft ([user@example.com](mailto:user@example.com))
3. System detects same email → Links Microsoft account
4. Now can sign in with either Google or Microsoft
5. Both access same profile, valuations, organizations
**Multiple Providers**:
* Can have multiple providers linked simultaneously
* Each provider shown in Linked Accounts section
* "Connected" badge indicates active links
* Can sign in with any linked provider
**Primary Email**: Your primary email address is determined by the first account you used to sign up. You can change your primary email in Personal Information, but linked accounts remain connected.
### Viewing Linked Accounts
**Linked Accounts Section** shows all authentication methods.
**For Each Provider**:
* **Logo**: Official provider branding
* **Name**: Provider name (Google, Microsoft, LinkedIn, Email/Password)
* **Status**:
* "Connected" (green badge) - Provider is linked
* "Not Connected" (gray text) - Provider not linked
* **Email**: Email address used for this provider (if connected)
**Layout**:
* Grid of provider cards (2 columns on desktop, 1 on mobile)
* Connected providers shown first
* Consistent visual styling
### Linking New Accounts
To link a new authentication provider:
1. **Sign Out** of current session
2. Go to login page
3. Click **"Sign in with \[Provider]"** (e.g., "Sign in with Microsoft")
4. **Use same email address** as your existing account
5. Complete provider's authentication
6. System detects matching email
7. Accounts automatically linked
8. Redirected to dashboard
**Important**: Email addresses must match exactly for automatic linking.
**Email Mismatch**: If you sign in with a different provider using a **different email address**, a new separate account will be created. To link accounts, use the same email for all providers.
### Unlinking Accounts
**Current Limitation**: Cannot unlink providers through UI.
**Why**: Ensures you always have a way to sign in. If you could unlink all providers, you'd lose access to your account.
**Workaround**: Contact [support@valiyou.com](mailto:support@valiyou.com) if you need to unlink a specific provider.
**Future Feature**: May allow unlinking if at least one provider remains linked.
## Security
Manage your account password and security settings.
**Password Section Visibility**: The Security section is only visible if you have email/password (credential) login enabled. If you only use social logins (Google, Microsoft, LinkedIn), this section will not appear.
### Password Management
Change your account password to maintain security.
#### When You Can Change Password
**Available If**:
* ✅ You signed up with email/password
* ✅ You set a password after signing up with social login
* ✅ "Email/Password" shows "Connected" in Linked Accounts
**Not Available If**:
* ❌ You only use social logins (Google, Microsoft, LinkedIn)
* ❌ No password has ever been set on account
**Social Login Only**: If you only use Google/Microsoft/LinkedIn to sign in, you don't have a Valiyou password. Password security is managed by your social provider. To set a Valiyou password, contact [support@valiyou.com](mailto:support@valiyou.com).
### Change Password Process
**Step 1: Enter Current Password**
1. Locate **"Current Password"** field
2. Enter your existing password
3. Used to verify your identity
**Step 2: Enter New Password**
1. Locate **"New Password"** field
2. Enter your desired new password
3. **Requirements**: Minimum 6 characters
4. **Recommendations**:
* Use 12+ characters for better security
* Mix uppercase, lowercase, numbers, symbols
* Avoid common passwords (password123, qwerty, etc.)
* Don't reuse passwords from other sites
**Step 3: Confirm New Password**
1. Locate **"Confirm New Password"** field
2. Re-enter the same new password
3. Must exactly match "New Password" field
4. Prevents typos
**Step 4: Save Changes**
1. Click **"Save Password"** button
2. System validates all fields:
* Current password is correct
* New password meets requirements (6+ chars)
* Confirm password matches new password
3. If validation passes, password updated
4. Success message appears
5. You remain logged in (no need to re-login)
**Password Requirements**: Passwords must be at least 6 characters long. For better security, use a strong, unique password that you don't use on other websites. Consider using a password manager.
### After Password Change
**What Happens**:
* ✅ Password updated in database (hashed securely)
* ✅ You remain logged in on current device
* ✅ Can immediately use new password
* ❌ Other active sessions are NOT revoked (still logged in on other devices)
**Security Consideration**:
* If you changed your password because of a security concern (account compromise), manually log out of all devices
* Or contact support to revoke all sessions
### Password Change Errors
**Error: "Current password is incorrect"**
**Causes**:
* Typed wrong password
* Caps Lock enabled
* Using old password
**Solutions**:
* Double-check your existing password
* Try toggling "Show Password" (if available)
* Use "Forgot Password" if you can't remember (login page)
***
**Error: "Passwords do not match"**
**Causes**:
* Confirm password field doesn't match new password
* Typo in one of the fields
**Solutions**:
* Re-enter both new password and confirm password
* Copy-paste is NOT recommended (defeats purpose of confirmation)
* Toggle "Show Password" to visually verify both fields match
***
**Error: "Password must be at least 6 characters"**
**Causes**:
* New password too short
**Solutions**:
* Use a longer password (6+ characters minimum)
* Recommend 12+ characters for good security
***
**Error: "Failed to update password"**
**Causes**:
* Network error
* Server error
* Session expired
**Solutions**:
* Check internet connection
* Refresh page and try again
* Log out and log back in
* Contact support if persists
### Password Security Best Practices
**Strong Password Tips**:
* ✅ Use 12+ characters
* ✅ Mix uppercase and lowercase letters
* ✅ Include numbers and symbols
* ✅ Use unique passwords for each site
* ✅ Use a password manager (1Password, Bitwarden, LastPass)
* ❌ Don't use personal info (name, birthday, etc.)
* ❌ Don't use common passwords (password, 123456, etc.)
* ❌ Don't reuse passwords from other sites
* ❌ Don't share passwords with others
**When to Change Password**:
* 🚨 If you suspect account compromise
* 🚨 If password was exposed in a data breach
* 🚨 If you shared password with someone
* ✅ Every 6-12 months as routine security
* ✅ If using a weak password
**Additional Security**:
* Enable 2FA on social logins (Google, Microsoft, LinkedIn)
* Use unique email address for important accounts
* Monitor Linked Accounts for unauthorized connections
* Review Audit Log regularly for suspicious activity
## Danger Zone: Delete Account
Permanently remove your Valiyou account and all associated data.
**PERMANENT ACTION**: Account deletion cannot be undone. After the 30-day grace period, all your data is permanently deleted and cannot be recovered. Proceed with extreme caution.
### What Gets Deleted
When you delete your account, the following are permanently removed after 30 days:
**Your User Data**:
* ✅ User profile (name, email, avatar)
* ✅ All linked accounts (Google, Microsoft, LinkedIn)
* ✅ Password (if set)
* ✅ Security settings
* ✅ Language preferences
**Organization Access**:
* ✅ All team memberships removed
* ✅ Access to all organizations revoked immediately
* ✅ Cannot view or edit any organization data
* ✅ Removed from Users lists in all organizations
**What Is NOT Deleted**:
* ❌ Organizations you created (must be deleted separately)
* ❌ Valuations created by you (remain in organization, attributed to "Deleted User")
* ❌ Comments and activity logs (remain for audit trail, show "Deleted User")
* ❌ Audit log entries (remain for compliance, show user ID)
**Data Attribution**: After account deletion, your past contributions (valuations, comments, edits) remain in organizations but are attributed to "Deleted User" for audit trail purposes. The actual content is preserved.
### Deletion Requirements
You **CANNOT** delete your account if:
**Sole Admin of Organizations**:
* ❌ You are the only admin of one or more organizations
* ❌ Organizations would be left without admin access
* ❌ System prevents deletion to protect organization data
**What You Must Do First**:
1. **Option A: Transfer Admin Rights**
* Go to each organization where you're sole admin
* Navigate to **Platform** → **Users**
* Promote another team member to Admin role
* Verify they have Admin access
* Then return to delete account
2. **Option B: Delete Organizations**
* Go to each organization where you're sole admin
* Navigate to **Platform** → **Organization Settings**
* Scroll to **Danger Zone**
* Delete organization (if you no longer need it)
* Then return to delete account
**Multiple Organizations**: If you're sole admin of multiple organizations, you must handle each one individually before account deletion is allowed.
### Deletion Process
**Step 1: Initiate Deletion**
1. Navigate to **Profile** page
2. Scroll to **Danger Zone** section at bottom
3. Click **"Delete Account"** button (red, destructive)
4. Deletion confirmation modal opens
**Step 2: System Check**
* System checks if you're sole admin of any organizations
* **If Yes**: Error modal appears listing organizations
* Message: "You are the only admin of the following organizations: \[List]"
* Action required: Transfer admin or delete organizations first
* Deletion blocked until resolved
* **If No**: Proceed to Step 3
**Step 3: Confirm Deletion**
1. Modal shows warning: "This action cannot be undone"
2. Lists what will be deleted (profile, access, memberships)
3. Type **DELETE** (all capital letters) in confirmation field
4. Must type exactly "DELETE" (case-sensitive)
5. Click **"Delete My Account"** button (red)
**Step 4: Grace Period Begins**
* Account marked for deletion
* **30-day grace period** starts
* You are immediately logged out
* Access to all organizations revoked
* Cannot log in (account locked)
* Email sent confirming deletion request
**Step 5: Deletion Completed**
* After 30 days, all data permanently deleted
* User profile removed from database
* Email address freed for re-use
* Linked accounts unlinked
* No recovery possible
**30-Day Grace Period**: You have 30 days to cancel the deletion by contacting [support@valiyou.com](mailto:support@valiyou.com). Provide your email address and support can restore your account. After 30 days, deletion is permanent and irreversible.
### Before Deleting Your Account
**Checklist Before Deletion**:
* [ ] Transfer admin rights to another team member (for organizations you manage)
* [ ] Or delete organizations you no longer need
* [ ] Save any important data, reports, or exports you want to keep
* [ ] Inform your team members of your departure
* [ ] Download any invoices or billing documents
* [ ] Cancel any active subscriptions (if you're billing admin)
* [ ] Export valuations or data you need for records
* [ ] Unlink any integrations (API keys, Power BI, Excel)
**Data Export Options**:
* API: Use API keys to export data before deletion
* Reports: Download PDF/Excel reports from Reports page
* Screenshots: Take screenshots of important data
* Billing: Download invoices from Billing → Invoices tab
### Alternatives to Account Deletion
Consider these alternatives before permanently deleting your account:
**Alternative 1: Leave Organizations**
* **If**: You just want to leave specific teams/organizations
* **Solution**: Ask an admin to remove you from Users page
* **Result**: You leave organization but keep account
* **Benefit**: Can rejoin later if needed
**Alternative 2: Log Out**
* **If**: You want to take a break or stop using temporarily
* **Solution**: Simply log out (no account deletion needed)
* **Result**: Account remains inactive, can log back in anytime
* **Benefit**: No data loss, easy to return
**Alternative 3: Downgrade Subscription**
* **If**: You're unhappy with cost or features
* **Solution**: Downgrade to free/starter plan
* **Result**: Keep account but reduce/eliminate costs
* **Benefit**: Can always upgrade later
**Alternative 4: Contact Support**
* **If**: You're unhappy with service or have issues
* **Solution**: Email [support@valiyou.com](mailto:support@valiyou.com) for help
* **Result**: May resolve issue without deletion
* **Benefit**: Support can often fix problems or provide alternatives
**Think Twice**: Account deletion is permanent. Consider alternatives like leaving organizations, logging out, or downgrading subscription before permanently deleting your account.
### Canceling Account Deletion
If you initiated account deletion but changed your mind:
**Within 30 Days**:
1. Email [support@valiyou.com](mailto:support@valiyou.com) immediately
2. Subject: "Cancel Account Deletion - \[Your Email]"
3. Include your registered email address
4. Support will restore your account
5. You can log back in normally
6. All data and access restored
**After 30 Days**:
* ❌ Deletion is permanent and irreversible
* ❌ No recovery possible
* ❌ Must create new account if you want to return
* ❌ All previous data lost forever
**Contact Support Quickly**: If you want to cancel deletion, contact [support@valiyou.com](mailto:support@valiyou.com) as soon as possible. Don't wait until day 29 - email immediately to ensure restoration.
## Permissions
Access to profile features based on your account status:
| Feature | All Users | Admin | Notes |
| ------------------------ | --------- | --------- | ------------------------------------- |
| **View Profile** | ✅ Yes | ✅ Yes | Everyone can access their own profile |
| **Edit Name** | ✅ Yes | ✅ Yes | Update your display name |
| **Edit Email** | ✅ Yes | ✅ Yes | Requires email verification |
| **Change Language** | ✅ Yes | ✅ Yes | Personal setting only |
| **Upload Avatar** | ✅ Yes | ✅ Yes | 2MB limit, standard formats |
| **View Linked Accounts** | ✅ Yes | ✅ Yes | See all connected auth providers |
| **Change Password** | ✅ Yes\* | ✅ Yes\* | \*Only if password is set |
| **Delete Account** | ✅ Yes\*\* | ✅ Yes\*\* | \*\*Cannot delete if sole admin |
**Personal Settings**: Profile settings are personal and do not require admin or special permissions. Everyone can manage their own profile independently.
## Common Use Cases
### Upload Profile Picture
1. Navigate to **Profile** (click avatar → Profile)
2. Click **avatar circle** at top of page
3. Drag image file onto circle (or click to browse)
4. Adjust crop area and zoom
5. Click **"Save"**
6. Avatar updates immediately throughout platform
### Change Email Address
1. Navigate to **Profile**
2. Edit **"Email"** field
3. Enter new email address
4. Click **"Save Personal Info"**
5. Check inbox for verification email
6. Click verification link in email
7. New email active after verification
### Switch Language to Danish
1. Navigate to **Profile**
2. Click **"Language"** dropdown
3. Select **"Dansk"**
4. Click **"Save Personal Info"**
5. Platform immediately switches to Danish
### Update Password
1. Navigate to **Profile**
2. Scroll to **Security** section
3. Enter **current password**
4. Enter **new password** (6+ characters)
5. Re-enter new password in **confirm** field
6. Click **"Save Password"**
7. Success message appears
### Leave an Organization
1. Ask organization admin to remove you
2. Admin goes to **Platform** → **Users**
3. Admin clicks **"Revoke"** on your user card
4. Confirm removal
5. You lose access to that organization
6. Your account remains active
### Prepare for Account Deletion
1. List all organizations where you're admin: **Platform** → **Users** (check green dot on avatar)
2. For each organization:
* **Option A**: Go to **Users**, promote another member to Admin
* **Option B**: Go to **Organization Settings** → Danger Zone → Delete Organization
3. Export important data: **Valuations** → **Reports** → Download
4. Download invoices: **Platform** → **Billing** → **Invoices** tab
5. Inform team members
6. Navigate to **Profile** → **Danger Zone**
7. Click **"Delete Account"**
8. Follow deletion process
## Troubleshooting
### Avatar Upload Issues
**Problem: Avatar Not Updating**
**Check**:
* File size ≤2MB
* Supported format (JPG, PNG, GIF, WebP, SVG)
* Internet connection stable
* Browser allows file uploads
**Solutions**:
1. Compress image (use online tools like TinyPNG)
2. Try different image format (convert to JPG)
3. Hard refresh page (Cmd+Shift+R or Ctrl+Shift+R)
4. Clear browser cache
5. Try incognito/private mode
6. Try different browser
7. Check browser console for errors (F12 → Console)
***
**Problem: Avatar Shows Old Image**
**Cause**: Browser cache
**Solution**:
* Hard refresh: Cmd+Shift+R (Mac) or Ctrl+Shift+R (Windows)
* Or clear browser cache in settings
* Or open in incognito/private window
***
**Problem: Cannot Crop Avatar**
**Cause**: Image too large, format issue, or browser compatibility
**Solutions**:
* Resize image before upload (max 2000×2000px recommended)
* Convert to JPG format
* Update browser to latest version
* Try different browser
### Email Verification Issues
**Problem: Verification Email Not Received**
**Check**:
* Spam/junk folder
* Email address typed correctly
* 5-10 minute delay normal
**Solutions**:
1. Wait 10 minutes
2. Check spam/junk folder thoroughly
3. Add [no-reply@valiyou.com](mailto:no-reply@valiyou.com) to contacts
4. Whitelist @valiyou.com domain in email settings
5. Change email again to trigger new verification
6. Try alternative email address
7. Contact [support@valiyou.com](mailto:support@valiyou.com)
***
**Problem: Verification Link Expired**
**Cause**: Links expire after 24 hours
**Solution**:
* Go back to Profile page
* Change email field again (triggers new verification)
* Check inbox for new verification email
***
**Problem: Verification Link Doesn't Work**
**Causes**:
* Link broken by email client (wrapped to multiple lines)
* Link already used
* Link expired
**Solutions**:
* Copy entire URL and paste in browser
* Request new verification (change email again)
* Contact support if persists
### Password Change Problems
**Problem: "Current password is incorrect"**
**Check**:
* Typing correct password
* Caps Lock not enabled
* Keyboard language correct
**Solutions**:
* Toggle "Show Password" if available
* Copy-paste password from password manager
* Use "Forgot Password" on login page to reset
* Ensure you're using Valiyou password (not Google/Microsoft)
***
**Problem: "Passwords do not match"**
**Cause**: Confirm password field doesn't exactly match new password
**Solutions**:
* Re-enter both fields carefully
* Toggle "Show Password" to see what you're typing
* Don't copy-paste (defeats purpose of confirmation)
***
**Problem: Password Section Not Visible**
**Cause**: You only use social login (no password set)
**Explanation**: If you signed up with Google/Microsoft/LinkedIn and never set a password, the Security section won't appear. Your password is managed by your social provider.
**Solution**: If you want to set a Valiyou password, contact [support@valiyou.com](mailto:support@valiyou.com)
### Account Deletion Problems
**Problem: Cannot Delete Account (Sole Admin)**
**Error**: "You are the only admin of the following organizations: \[List]"
**Cause**: System prevents deletion when you're the only admin of organizations
**Solutions**:
1. **Transfer Admin** (Recommended):
* Go to each listed organization
* Navigate to **Platform** → **Users**
* Find another active team member
* Expand their permissions
* Check **"Admin"** checkbox
* Confirm granting Admin
* Verify they have Admin status (green dot on avatar)
* Repeat for all organizations
* Return to Profile → Delete Account
2. **Delete Organizations**:
* Go to each listed organization
* Navigate to **Platform** → **Organization Settings**
* Scroll to **Danger Zone**
* Click **"Delete Organisation"**
* Type **DELETE** to confirm
* Organization deleted
* Repeat for all organizations
* Return to Profile → Delete Account
***
**Problem: Typed DELETE But Button Disabled**
**Causes**:
* Didn't type in all capitals: **DELETE** (not delete or Delete)
* Extra spaces before/after
* Confirmation field not focused
**Solution**:
* Clear field
* Type exactly: **DELETE** (all caps, no spaces)
* Click inside field first, then type
***
**Problem: Changed Mind After Deletion**
**Within 30 Days**:
* Email [support@valiyou.com](mailto:support@valiyou.com) immediately
* Subject: "Cancel Account Deletion"
* Include registered email address
* Support will restore account
**After 30 Days**:
* Cannot recover (deletion permanent)
* Must create new account
## Next Steps
Add avatar and verify email for complete profile
Choose your preferred language (English/Dansk)
Ensure strong password or enable 2FA on social logins
Verify all connected authentication providers
Navigate to Billing to manage subscription
**Complete Your Profile**: A complete profile with avatar and verified email helps your team members recognize you and improves communication. Take 2 minutes to update your profile now!