%20(4).png?fit=max&auto=format&n=WLUySF7eTItpBXNF&q=85&s=6ed493e62bb4ba4fea14c0c6a990cbfc)
Inventory Table
Comprehensive table with all sponsorship items.Table Columns
Drag Handle (leftmost):- Six-dot icon for drag-and-drop
- Click and drag to reorder items
- New order saves automatically
- Primary identifier
- Bold text
- Click row to edit
- Inline dropdown
- Select from configured categories
- Quick-change without opening modal
- Inline dropdown
- “All events” or specific event
- Quick-change assignment
- Inline dropdown
- “All Tiers” or specific tier requirement
- Restricts item availability per tier
- Inline number input
- Max quantity available
- Empty = unlimited
- Changes save automatically
- Currency formatted (e.g., “€5,000”)
- Right-aligned
- Hidden in Negotiator Mode
- Edit button - Opens edit modal
- Delete button - Opens delete confirmation
Inline Editing
Most fields can be edited directly in the table without opening the modal: Editable Inline:- Category dropdown
- Event dropdown
- Required tier dropdown
- Max quantity input
- Item name (use Edit button)
- Description (use Edit button)
- Unit cost (use Edit button)
- Boolean toggle (use Edit button)
Auto-Save: Inline edits save automatically when you change the value. No need to click “Save”!
Add Item Button
Location: Top right of Library tab Button: Blue primary button “Add Item” Action: Opens Add Item modalAdd/Edit Item Modal
Comprehensive modal for creating or editing inventory items.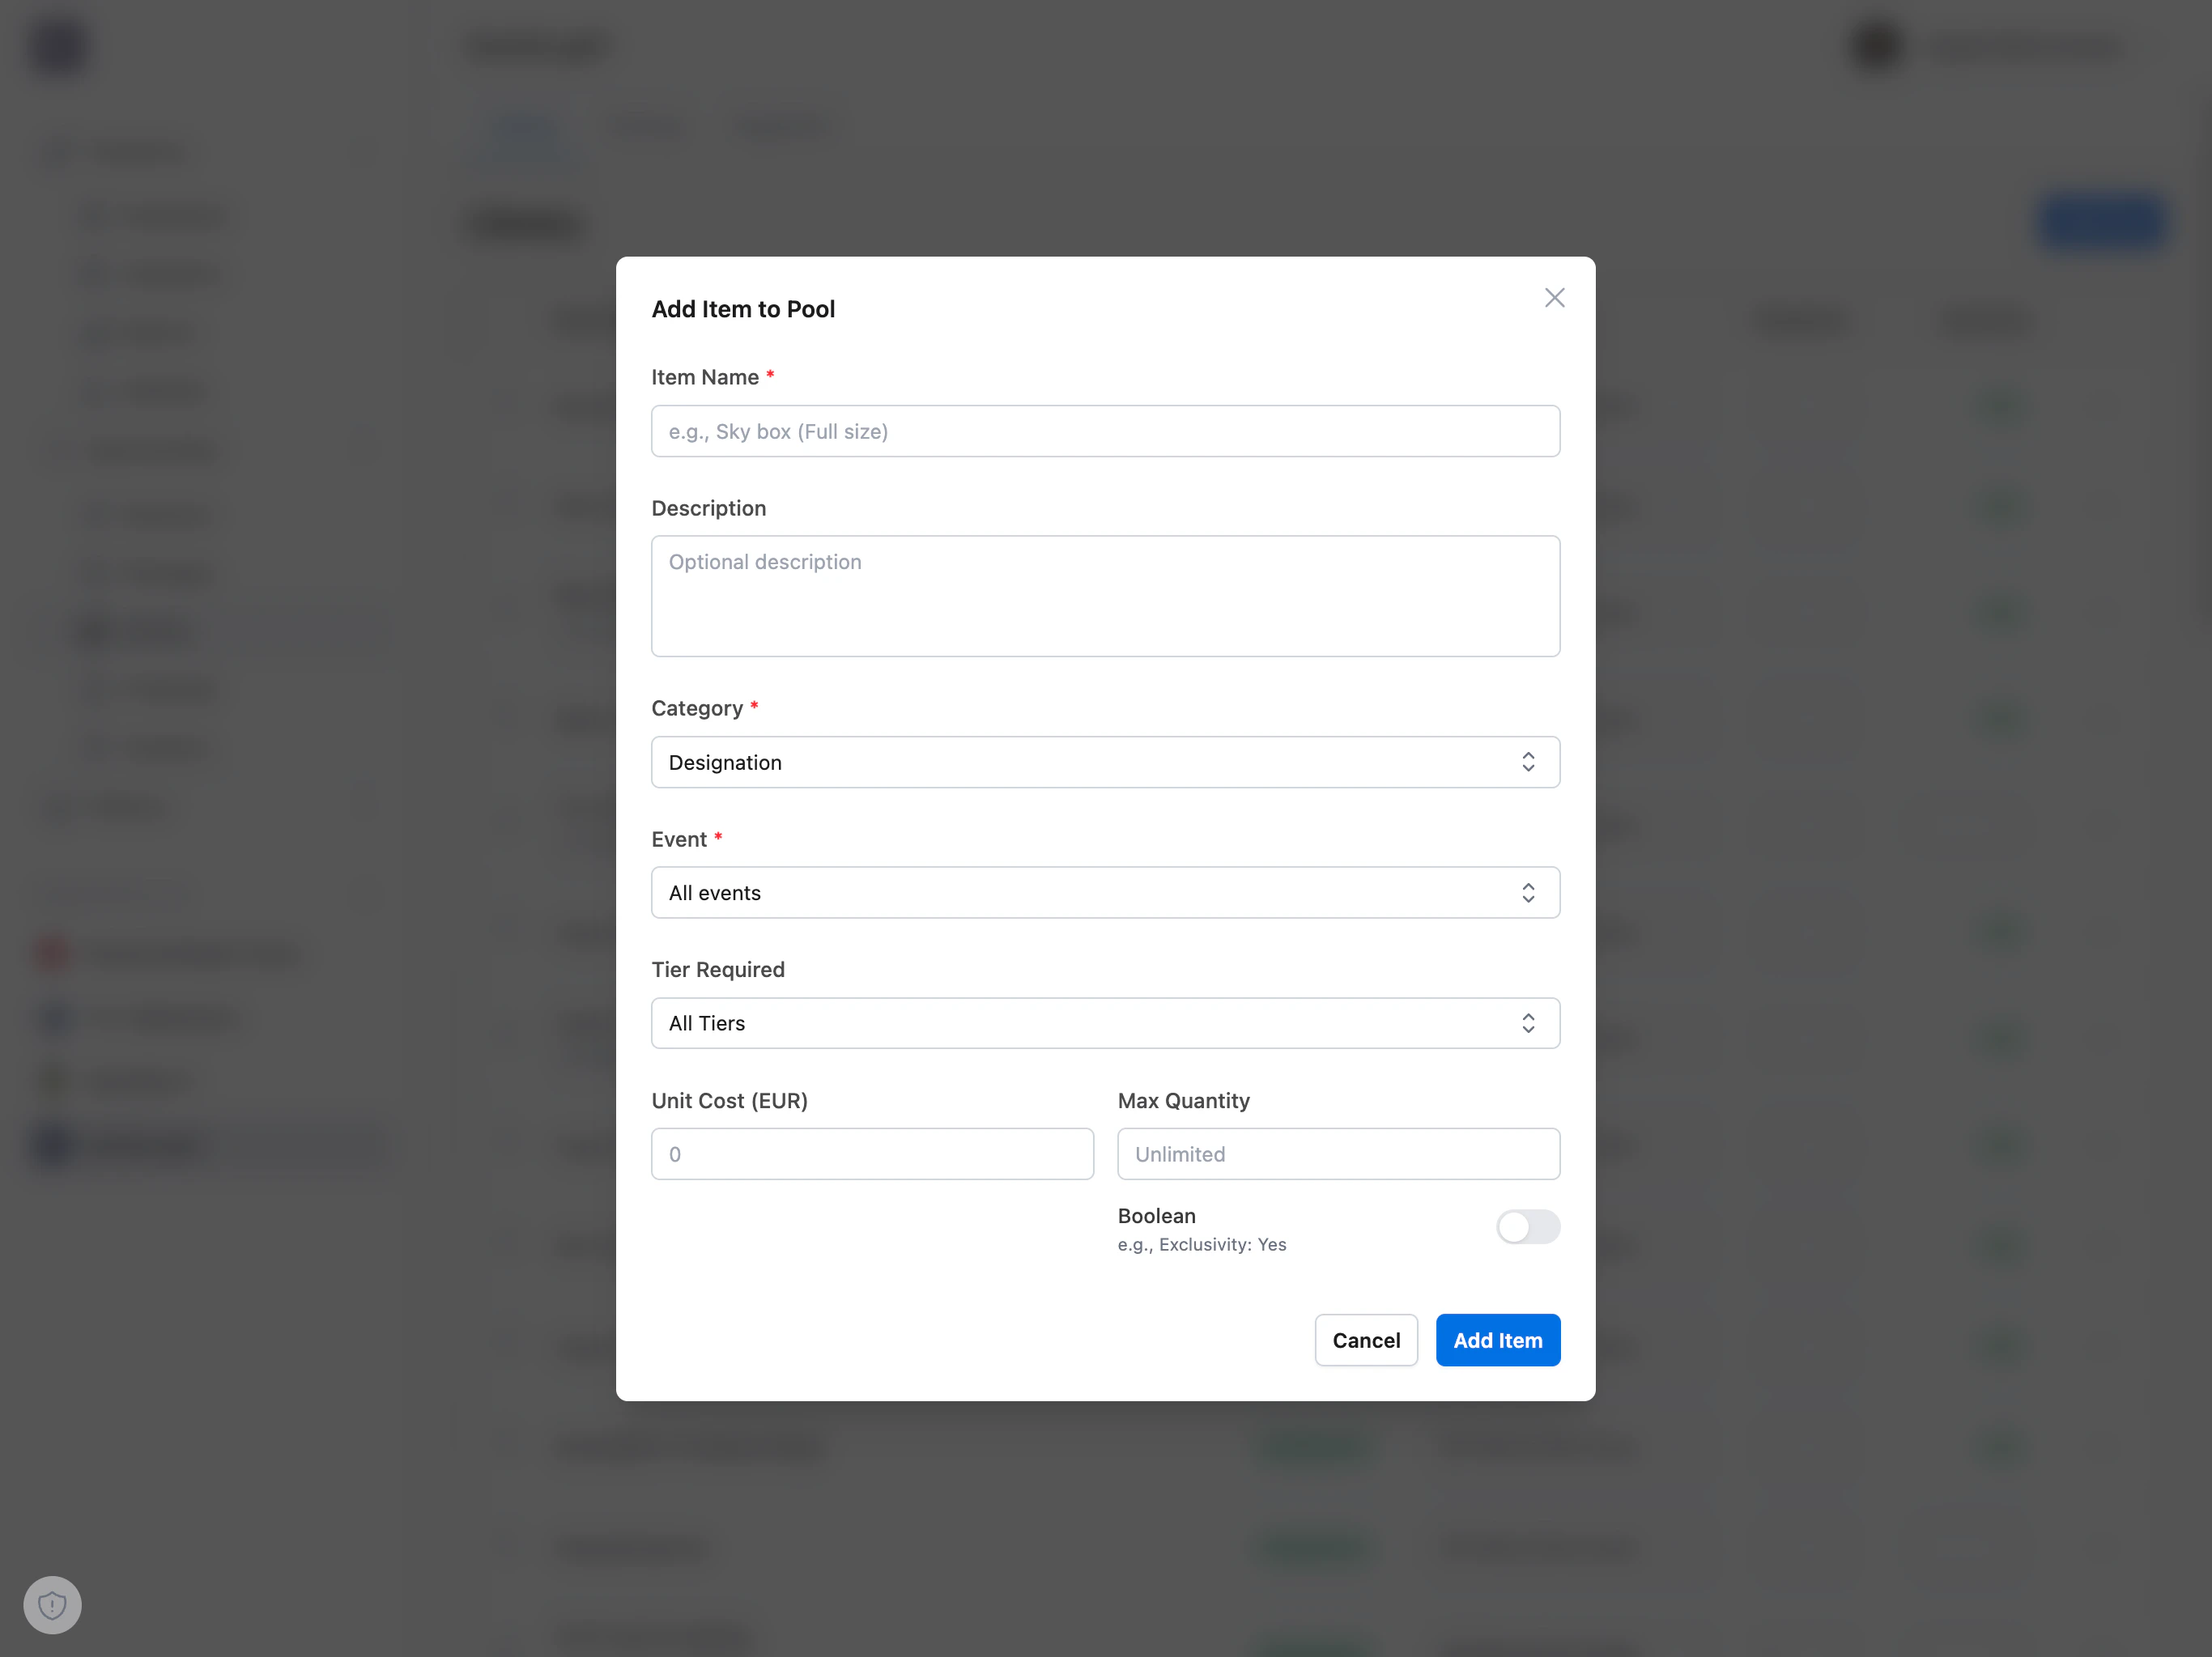
Modal Fields
Item Name (required):- Clear, descriptive name
- Appears in packages and proposals
- Example: “Stadium Naming Rights”, “VIP Season Tickets”
- Detailed explanation of the item
- Visible to sponsors in proposals
- Supports multi-line text
- Select from dropdown
- Built-in Categories: Designation, Hospitality
- Custom Categories: Add your own in Settings tab
- Quick Add: Click ”+ Add category” to create new one instantly
System Categories: “Designation” and “Hospitality” are built-in and cannot be deleted. Custom categories can be managed in Settings.
- “All events” (default) - Item applies to all events
- Specific Event - Item only for one event
- Quick Add: Click ”+ Add event” to create new event
- Event Details: Click pencil icon to view/edit event info
- “All Tiers” (default) - Available to all sponsors regardless of tier
- Specific Tier - Only available to sponsors at this tier level
- Quick Add: Click ”+ Add tier” to create new tier level
- Tier Management: Click pencil icon to edit tiers
Tier Restrictions: Use this to create exclusive items for premium sponsors (e.g., “Platinum Lounge Access” only for Gold tier).
- Cost per unit in base currency
- Example: €5,000 for one VIP ticket
- Used in package pricing calculations
- Hidden in Negotiator Mode (proposal-based pricing)
- Maximum available quantity
- Empty = unlimited
- Example: 100 VIP seats, 1 stadium naming right
- Enforced in Package Builder
- OFF (default) - Quantity-based item
- ON - Yes/No checkbox item
- Boolean items ignore Max Quantity field
- Example: “Logo on Website” (either included or not)
Quick Add Features
The modal includes quick-add buttons to create categories, tiers, and events without leaving the modal:Quick Add Category
Button: ”+ Add category” (in Category dropdown) Action: Opens mini-modal with:- Category name input
- Color picker (optional)
- Save button
Quick Add Tier
Button: ”+ Add tier” (in Required Tier dropdown) Action: Opens Tier Management modal with:- List of existing tiers
- Add new tier button
- Edit/delete existing tiers
- Drag-and-drop reordering
Quick Add Event
Button: ”+ Add event” (in Event dropdown) Action: Opens Add Event modal with:- Event name (required)
- Location details (name, address, city, postal code, country)
- Period (start date, end date)
- Description
- Save button
Edit vs View Mode
Edit Icons:- Category: No edit icon (managed in Settings)
- Tier: Pencil icon - opens Tier Management modal
- Event: Pencil icon - opens event details with location/period info
- Event name
- Location (if provided)
- Period dates (if provided)
- Description (if provided)
- Edit and Delete buttons
Modal Actions
When Adding:- Cancel - Close without saving
- Add Item - Create item (blue button)
- Cancel - Close without saving
- Delete Item - Delete item (red button)
- Save Changes - Update item (blue button)
Delete Item
Delete Confirmation Modal
Triggered by:- Clicking trash icon in table
- Clicking “Delete Item” button in edit modal
- Title: “Delete Item”
- Message: “Are you sure you want to delete ‘[Item Name]’?”
- Affected Packages List: Shows which packages use this item
- Confirm: “Delete” (red button)
- Cancel: “Cancel” (gray button)
Affected Packages
If the item is used in packages, the modal displays: Section: “Packages using this item” List: All package names containing this item Example:- Gold Partner Package
- Platinum Sponsor Bundle
- VIP Experience Package
If the item isn’t used in any packages, this section is hidden and deletion is safe.
Reordering Items
Drag-and-Drop Functionality
How to Reorder:- Hover over item row
- Click and hold the six-dot drag handle (leftmost column)
- Drag item up or down
- Release to drop in new position
- Order saves automatically
- Items appear in Package Builder in this order
- Organize by importance, category, or alphabetically
- Strategic ordering improves package building UX
Boolean vs Quantity Items
Two types of items serve different purposes:Quantity-Based Items (Default)
Characteristics:- Has Max Quantity field
- Shown with quantity selector in Package Builder
- Example: “VIP Tickets” (max 100)
- Physical items with limited availability
- Tickets, seats, parking spaces
- Merchandise quantities
- Advertising impressions with caps
Boolean Items (Checkbox)
Characteristics:- Boolean toggle ON
- No quantity field (always 1 or 0)
- Shown as checkbox in Package Builder
- Example: “Logo on Website” (yes/no)
- All-or-nothing offerings
- Digital placements (logo on website, social media mention)
- Rights and naming (stadium naming, jersey sponsor)
- Exclusive benefits (backstage access, meet-and-greet)
When to Use Boolean: If the item can’t have a quantity (it’s either included or not), use boolean mode. If sponsors can have multiple (1, 2, 5 units), use quantity mode.
Item Categories
Built-in Categories
Designation:- Brand placement and recognition items
- Examples: Logo on jersey, stadium naming rights, banner placement
- Cannot be deleted (system category)
- Guest experiences and VIP access
- Examples: VIP tickets, lounge access, meet-and-greet, parking
- Cannot be deleted (system category)
Custom Categories
Create unlimited custom categories for your specific needs: Common Custom Categories:- Digital - Social media, website, email campaigns
- Print - Programs, posters, flyers
- Events - Special event access, activation opportunities
- Merchandise - Branded merchandise, giveaways
- Media - TV commercials, radio spots, press releases
- Experiences - Behind-the-scenes tours, player appearances
Tier Requirements
Restrict item availability by sponsorship tier level.All Tiers (Default)
Setting: Required Tier = “All Tiers” Availability: All sponsors regardless of tier Use Cases: Standard items available to everyoneTier-Restricted Items
Setting: Required Tier = Specific tier (e.g., “Gold”) Availability: Only sponsors at this tier or higher Use Cases: Exclusive premium offerings Example Tier Structure:- Platinum Tier: All items (including Platinum-exclusive)
- Gold Tier: Gold + Silver + Bronze items (no Platinum-exclusive)
- Silver Tier: Silver + Bronze items (no Gold/Platinum-exclusive)
- Bronze Tier: Bronze items only (no premium items)
Tier Hierarchy: When using tier restrictions, ensure your tier order in Settings reflects the hierarchy (Platinum > Gold > Silver > Bronze).
Event Assignments
Control which events items apply to.All Events (Default)
Setting: Event = “All events” Availability: Item available for all events Use Cases: Year-round offerings, season-long benefitsEvent-Specific Items
Setting: Event = Specific event (e.g., “Championship Game”) Availability: Item only for this event Use Cases: Special event exclusives, limited-time offers Example Event Items:- “Championship Game VIP Box” - only for championship event
- “Season Opener Banner” - only for opening game
- “Annual Gala Table” - only for yearly gala event
Common Use Cases
Building Initial Library
- Go to Settings tab
- Create categories (Digital, Hospitality, Events, etc.)
- Create tier levels (Platinum, Gold, Silver, Bronze)
- Create events (2024/2025 Season, Championship Game, etc.)
- Go to Library tab
- Add items with appropriate categories, tiers, events
- Set unit costs and max quantities
- Reorder items for logical Package Builder flow
Creating Tier-Exclusive Offers
- Create premium tier in Settings (e.g., “Platinum”)
- Add exclusive items (e.g., “CEO Meet-and-Greet”)
- Set Required Tier = “Platinum”
- Set high unit costs
- Use in premium packages
Managing Event-Specific Items
- Create event in Settings (e.g., “Annual Gala 2025”)
- Add event-specific items (e.g., “Gala VIP Table”)
- Set Event = “Annual Gala 2025”
- Set Max Quantity = limited availability
- Package and sell for that event only
Updating Library Mid-Season
- Edit existing items inline (change quantities, tiers, events)
- Add new items as opportunities arise
- Archive outdated items (delete if no packages use them)
- Reorder items for better Package Builder UX
- Update unit costs if pricing changes
Troubleshooting
Inline Edit Not Saving
Try:- Check network connection
- Refresh page and try again
- Use Edit button modal as alternative
- Check browser console for errors
Drag-and-Drop Not Working
Try:- Use mouse (not touch) on desktop
- Check if table is scrollable (scroll into view first)
- Refresh page
- Use keyboard sensors (Tab + Space + Arrow keys)
Item Not Appearing in Package Builder
Check:- Item has correct tier requirement for sponsor
- Item has correct event assignment
- Item isn’t archived/deleted
- Package Builder is filtered correctly